


Video editing is both a formal and openly artistic process. It relies on a cycle of vision, creativity and technical skill to turn raw footage into a new masterpiece.
How you work on it will naturally depend on the type of project. But whether personal or professional, it’s vital to have a structure for doing things in the right way.
This guide explains what the video editing workflow is, why it works and how to do it.
1. What is an editing workflow?
Every video project is different and will have different ways to approach each one. Steps and stages will change and develop along the course of completion.
However, the video editing steps that are most common and routinely used can be viewed as the editing workflow.
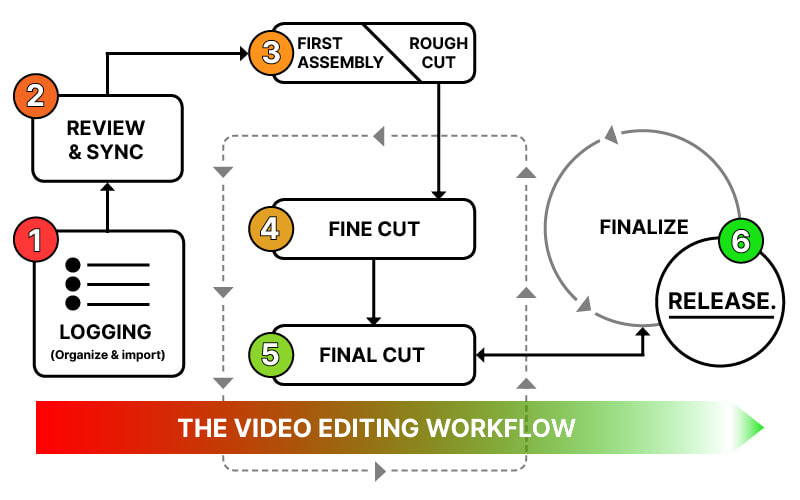
This is often divided into several key phases that follow progress through to a final edit.
✓ Pipeline is often another word used to describe the video editing workflow, but they basically mean the same thing.
2. Why is a workflow essential?
The best video editing workflow helps us all achieve a finished video that meets the brief.
It gives editors of all levels a framework of points or “milestones” for gauging progress during a project. It also provides a familiar, repeatable process that is known by experts and beginners alike.
Key benefits of using the editing workflow:
- Good practice also used by the video production industry
- Guides a project from step X to step Z without skipping step Y
- Helps to deliver a quality, focused edit efficiently and on time
3. Editing workflow stages
Video editing workflows will vary and, naturally, have multiple tasks to follow in each phase.
However, to describe the basic video editing workflow in the most straightforward way, we will consider a 6-stage plan. It applies to most projects while fitting nicely alongside HitFilm workflow tips and features we will identify along the way.
TIP: The post How to Download and Install HitFilm has full instructions on getting started with the software.
3.1 Logging (Organize & import)
Video editing starts with good organization. This is when all recorded assets from the shoot are gathered and arranged neatly for work.
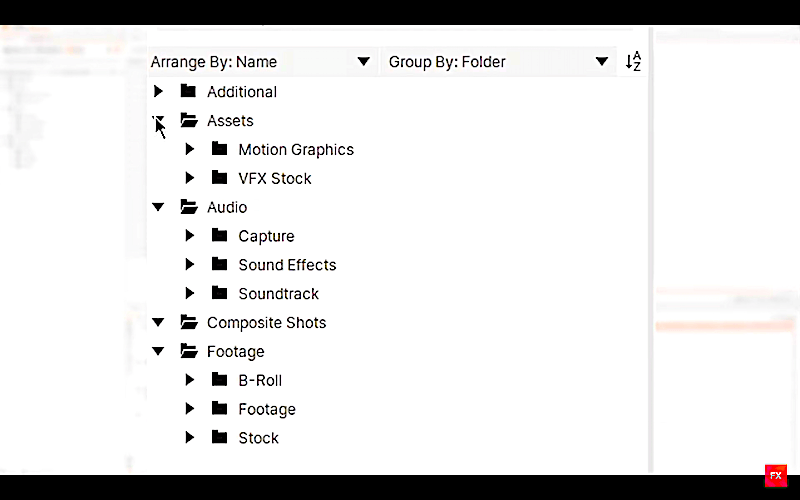
Files are renamed more clearly and sorted into folders or “bins” that keep raw footage easy to find. The last thing you want is to lose an important scene or take.
Getting this storage right initially will then help for importing into your projects. HitFilm’s Media Panel allows new folders to be added and files searched to make everything stay organized as you edit.
3.2 Review & synchronize
Before any editing begins, it is always good to review the footage. Use this phase to get to know what video is available, along with any notes or instructions given.
If you shot the video yourself, looking back on what you have will help you recall which takes might work best:
- Scrub and watch clip contents inside the Trimmer preview window.
- Use color labels to distinguish between clips, layers or timeline tracks.
If you have audio to synchronize, this is also the stage to do it. HitFilm can perform automatic syncing so audio and video are merged (matched) perfectly together, ready for the timeline.
✓ Proxies are used to preview video at lower resolutions within HitFilm, allowing for faster playback until rendering.
3.3 First Assembly/Rough cut
Once you know what you have to work with, it’s time to start editing!
Think of this phase as making a very first rough draft of the video. We are essentially “stringing out” raw clips to form an initial basic story or structure.
First assembly cuts are normally very long, with rough cuts slightly more refined.
Start by dragging imported clips into the editing timeline to resize and reorder things into a sequence. Keep it simple at this stage and avoid doing anything more advanced yet.
- Rough cuts don’t need to be neat and tidy.
- Order the clips, so the content flows and makes sense.
- Use placeholders (layers) to indicate any transitions, text or FX.
✓ HitFilm’s adaptive trimming tools are ideal for making rough cuts. Clips can be cropped or sliced into shape before and after being placed on the editing timeline.
3.4 Fine cut
Making a fine cut is all about turning that first rough draft into something more polished. It’s when you focus more on individual frames rather than on the overall structure.
Editors will go back and improve the various shot cuts to make them sharper, neater and more effective. Watch our guide, Essential Cuts for Filmmakers, for more tips here.
Other fine-cut tasks might include stabilizing shaky footage or inserting any B-roll and transition effects.
Transitions are techniques for seamlessly transitioning from one shot to another. For example, HitFilm’s drag-and-drop transitions make it simple to add wipes, fades or dissolves to the editing timeline.
✓ Picture Lock often refers to an approved fine cut that needs no more big changes.
3.5 Final cut
The final cut is where all the important final extras, such as VFX and audio, go on. It is also where effects like color correction and color grading are applied.
Generally, editors only add these finishing touches after the fine-cut footage is locked down. This way, these intricate visual sequences won’t be removed in any more cuts.
How does HitFilm help me reach a final cut?
- Visual effects (VFX) support for compositing 3D models, animations and text.
- Chroma Keying for instantly removing green screens for new backgrounds.
- Grade clips apply a single color grading effect across a whole project.
- Stock assets library of professional sound effects and royalty-free music.
✓ HitFilm’s new update also gives access to a growing collection of stock footage and templates for you to use.
3.6 Finalize and release
The last phase is about readying the video for release. Finalizing might mean exporting in different formats and testing playback across TV, mobile phone or projector.
HitFilm is ideal for this because it has multiple export presets you can use or customize. So whether it’s for YouTube, Instagram or TikTok – your video will fit all sharing platforms.
Finalizing might reveal certain tweaks or re-edits to revise. Remember that every workflow step is iterative, which means we might go again several times until finished.
✓ FXhome’s Imerge is a powerful image editor for designing YouTube thumbnails or promo graphics for a video release.
4. Extra HitFilm features for faster ‘flow
HitFilm has a whole host of supporting features spanning every video workflow step. Mastering them will help to make editing faster and easier for users of all levels.
General Hitfilm workflow features for efficient editing:
- Shortcuts make editing actions faster with customizable keystrokes.
- Custom presets save your favorite effect settings for repeated use.
- Autosaving for automatic backup and recovery of project changes.
