


Splitting video is an editing trick for showing multiple shots on-screen. In this guide, we discuss why and when to use it before explaining how to do a split screen in HitFilm.
In video and filmmaking, there is an art to moving between shots. We generally use “cuts” to shift between single, fullscreen points of interest for the audience to follow.
But what happens when we want to show two or more things happening at once?
A popular way to achieve this is with a split screen.
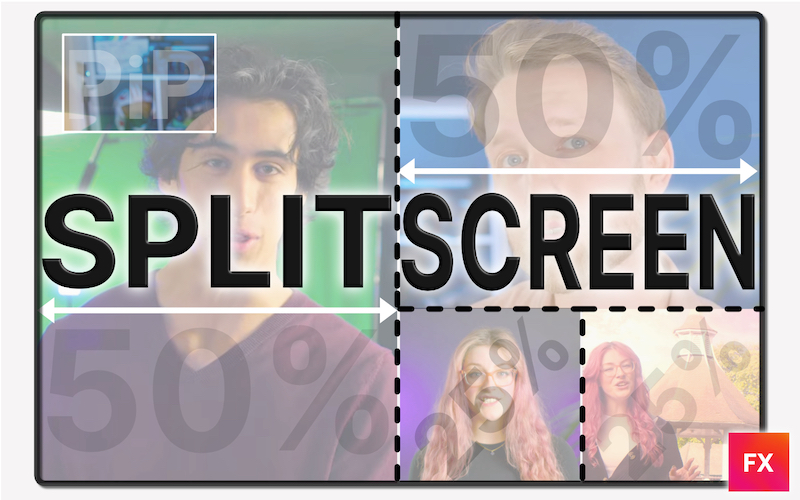
What is a split screen?
A split screen is a way to show more than one video sequence together.
Typically it refers to a literal 50/50 split of the screen area, straight down the middle. Each half then displays its own independent source or series of shots.
The “split” is often indicated by a line and could run vertically, horizontally and even diagonally. Picture-In-Picture is an alternative to screen splitting which we’ll also cover in this guide:
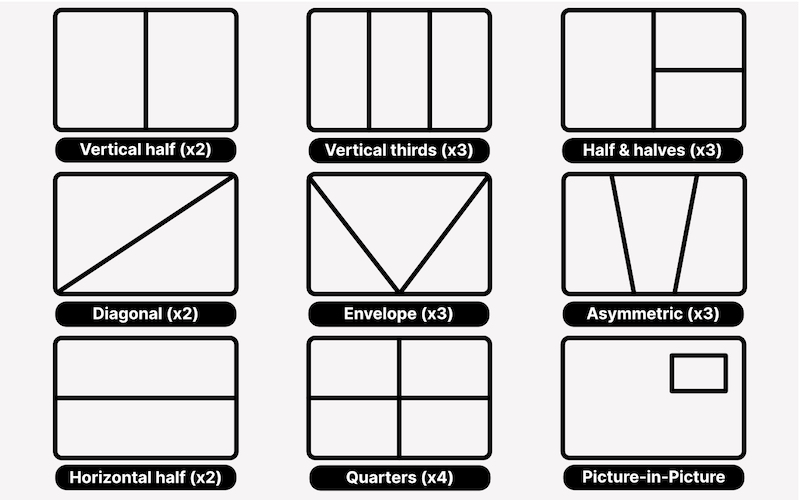
- Split screen = Divides the screen area by half, into thirds, quarters or more.
- Picture-in-Picture (PiP) = Overlays smaller video boxes onto the main screen.
A split screen video editor is used to achieve both techniques, but not necessarily to “split video” as such. Software like HitFilm uses layers and masks to combine or stack video clips together and produce the effect.
Advantages of using split screens
There are many advantages to using split screens in your video editing projects.
First, it avoids unnecessary fullscreen cuts. This can improve the pacing and timing so two or more sequences work in sync.
Split screen also suggests to audiences that two things are occurring together in real-time. This can be advantageous for several situations:
- Storytelling. Showing two scenes happening side-by-side is useful for conveying simultaneous events. Same moment in time, different locations.
- Review. Great for reacting and talking about something happening such as a live clip or video gaming stream.
- Talking Heads. Two or more people talking to each other on screen, a bit like a Zoom call or interview.
TIP: PiP is often used as a way to split screen live video especially when streaming.
Examples of when it could be used
Think of a phone call in a movie, when a character calls another. Very often the screen will split in two to show the other person answering their phone.
The two will then exchange dialogue across the split screen to show that interaction.
It’s also useful for setting a scene. Showing multiple clips of a location across multiple splits is great for quickly conveying a sense of place.
Similarly, you might want to show more than one viewpoint. Combining multiple shots at once is excellent for suggesting there’s more than a single way to see things.
TIP: Think carefully how a split screen or PiP could help the flow of your video project.
How to make a split screen in HitFilm
With HitFilm, you can create split screens in the editor or by using available effects.
This usually starts by placing chosen clips on the timeline or, more commonly, by using composite shots.
Composite shots are great for combining and containing several clips together that can then be inserted into the timeline whenever needed.
From here we can then use layer masks to create any screen splits and even add dividers.
Using HitFilm’s built-in effects
HitFilm also includes a couple of great effects for split screen and Picture-In-Picture.
Both are available from the Generate pack and can be used without any watermarking in HitFilm Creator and HitFilm Pro. In the free version, both are still selectable but will be watermarked.
Here we’ll have a closer look at both and explain how they can be used in your projects.
TIP: You can check the full list of features across HitFilm subscriptions here.
Split Screen Masking effect
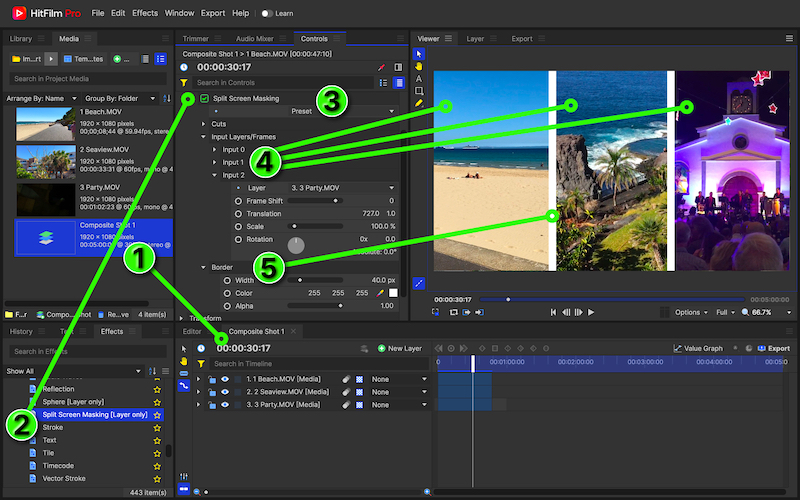
HitFilm’s Split Screen Masking [Layer only] effect is great for adding complex split screens quickly and easily.
It has presets for arranging multiple clips into asymmetric, diagonal or gridded split screens with automatic borders.
Create your split screen in just five steps (see image below):
- Create a new composite shot containing all your split screen clips.
- From the Effects > Generate folder, apply Split Screen Masking [Layer only] to the top clip.
- Use the Preset dropdown menu to pick a split screen type.
- Select a clip for each split with the Input Layers/Frames > Input parameters.
- Border adds divider lines based on the Width (px) Color and Alpha options.
Each split is an “Input Layer” that is basically a readymade mask for each clip. You can then use the transform handles in the Viewer to position and scale the videos into view.
PiP (Picture-in-Picture) effect
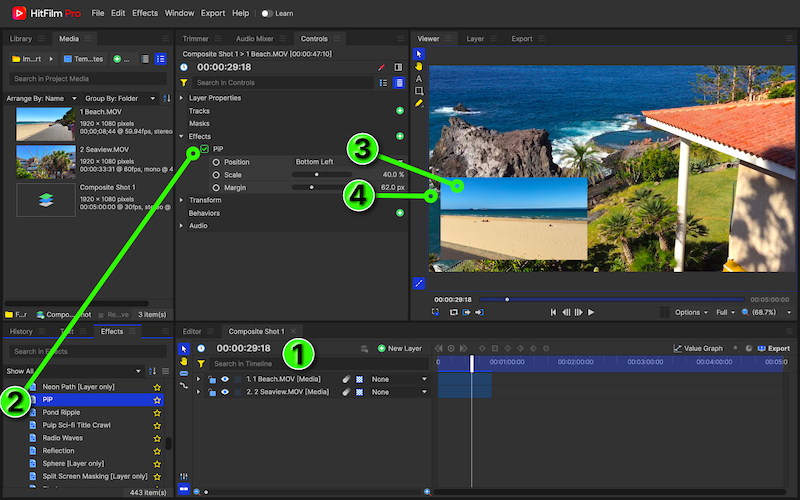
Similarly, HitFilm also has a PiP effect for more easily adding a Picture-in-Picture.
This quickly places one clip into a viewing box above the other. Its effect settings then make it easy to choose where it overlays (Position) along with the size.
Create your Picture-in-Picture in just four steps (see image below):
- Create a composite shot or insert two clips in parallel on the timeline.
- From the Effects > Generate folder, drag the PiP effect onto the top clip.
- Use the Position dropdown menu to place the PiP box on screen.
- Scale sets the size (%) and Margin (px) sets the distance from the screen edge.
You can see this effect used for showing gameplay footage in our video How to make a streamer layout in HitFilm.
Final tips for better splits
Creating good split screens in your video projects doesn’t start with the editing.
Ideally, you’ll want to design those sequences during the storyboarding phase. Take some time to think about the type of split and the shots each will contain.
This will be very helpful during production and framing things correctly during the shoot.
For example, it might be beneficial to position your person or subject to the right or left of the camera shot to fit the split.
When you do then come to edit, consider how you introduce the split screen. It’s often best to soften the effect and avoid any jarring “jump cuts” by using:
- Transitions such as screen “wipes” to gracefully switch into a split.
- Keyframe animations for sliding each split screen section into view.
More resources
Beyond split screening, HitFilm offers a huge collection of additional tools and effects for your projects. Be sure to follow more guides across FXhome’s learning resources to get professional practical advice for video editors of all levels.
Related links for improving your video editing skills:
- A guide to quick video editing
- Video game editing masterclass
- Inside the video editing workflow
- Video editing techniques explained
For more practical tips on how to use HitFilm check out the FXhome blog and YouTube channel.
