


One of the last steps in a video project can often be both exciting and quite confusing.
The post-production work is complete, the whole thing looks and sounds amazing inside the editing suite. It’s now time to render it out into the big wide world and share it, but how?
Thankfully, HitFilm keeps exporting simple and flexible. Over the course of this article you’ll learn all the methods, file formats and presets needed to export HitFilm projects.
TIP: In a hurry to export your project? Check the video on How to Export your Video in HitFilm for additional practical advice.
Export methods
To get started, it’s worth understanding the three main export methods found in HitFilm.
Each is readily accessible from the timeline so as not to break the flow of editing for a moment!
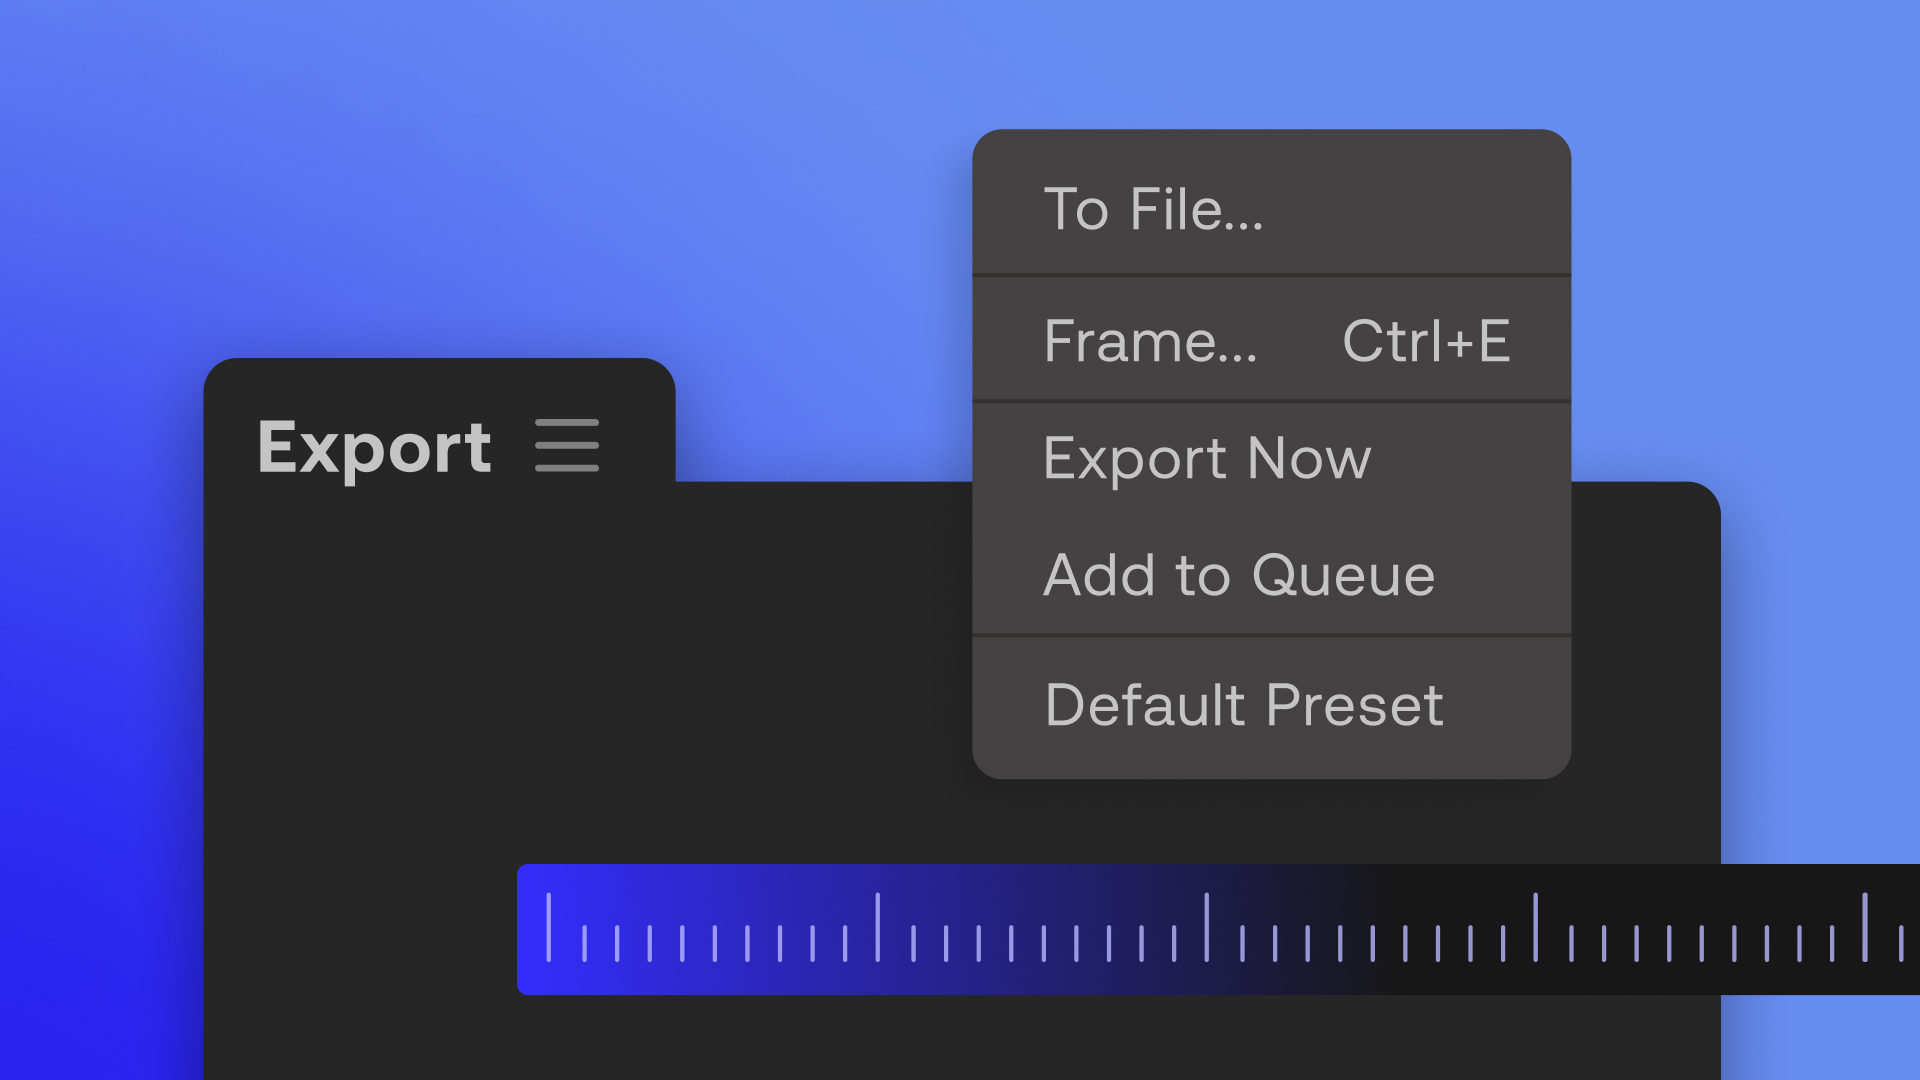
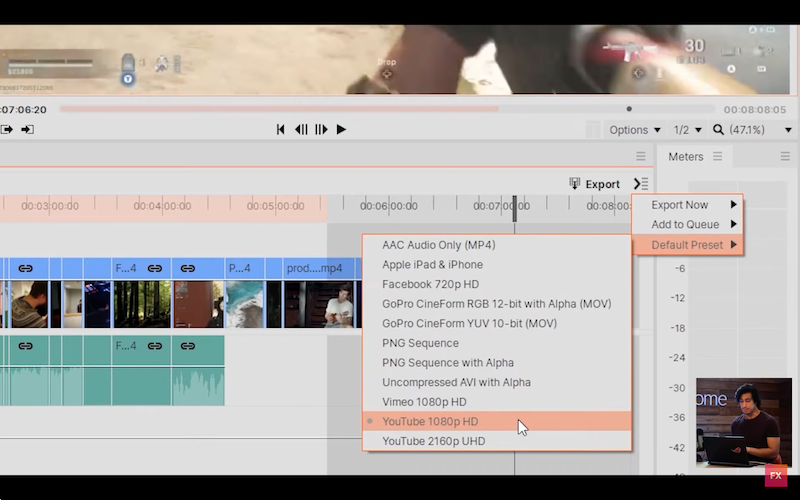
A) Export Now
This is an immediate way to make an export. Although still added to the queue, the Export Now command starts right away.
HitFilm will use the currently selected Default Preset for this type of export.
As in all cases, you can pick the portion of the timeline being exported. See below for more on how the Contents and In-to-Out Area apply here.
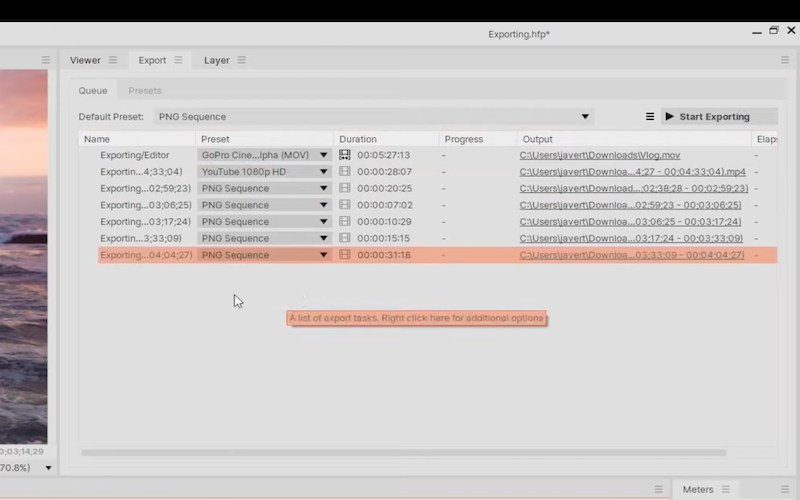
B) Add To Queue
HitFilm also has an Export Queue for lining up export tasks. Think of it as a list where exports stack up and wait patiently to be exported in sequence.
Exports added to the queue are “snapshots” of that moment. This means any subsequent edits made will not be included, only the timeline state as it was at time of being added.
Click the Start Exporting button to begin exporting all queued items. This then changes to Suspend Exporting to allow progress to be paused.
C) Contents and In-to-Out Area
HitFilm edits videos along a timeline. The “Contents” of that timeline includes all clips and audio from the start of the first, to the end of the last track.
If you choose to export Contents, HitFilm exports a snapshot of the whole project.
However we can also choose to export just a selection instead. Above the Editor timeline is a red ribbon-like selector called the In-to-Out Area.
This sets a start (In) and end (Out) point inside or beyond the timeline’s Contents. If you select In-to-Out Export, HitFilm exports only this selection.
Export options explained
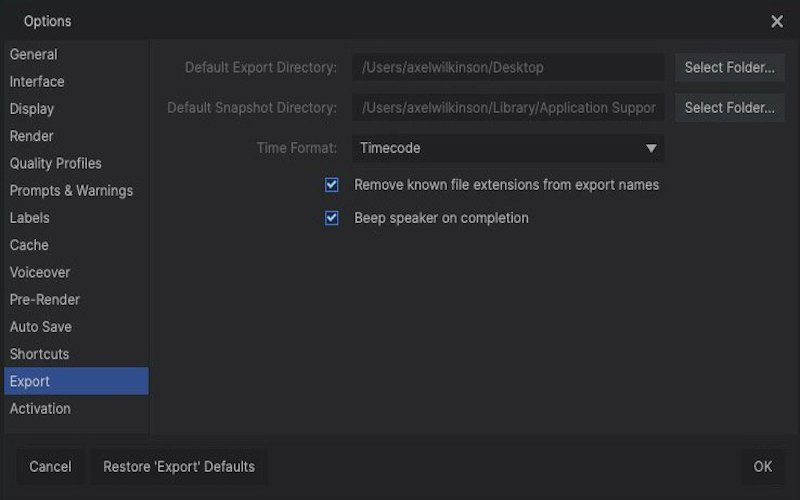
HitFilm has several Export options available within its File>Options window:
- Default Export Directory: Storage location of where exports are saved.
- Default Snapshot Directory: Sets the desired disk location of timeline snapshots stored until the queued export is completed.
- Time Format (Natural/Timecode/Seconds): Selects how the elapsed and remaining export times are displayed.
Remove known file extensions from export names is ticked by default. This is basically used to avoid duplicate file extensions in the name of export files.
To get a helpful audio alert for each completed export, keep Beep speaker on completion checked.
Video file formats explained
Digital video data is “encoded” into a file format or “codec” when exported. HitFilm supports three key types, with each having certain advantages we will explain here.
HitFilm’s three main video formats and how they differ:
| Format | Attributes | Reasons to use |
|---|---|---|
| MP4 (MPEG-4) | H.264 codec is the standard for HD videos. Offers high quality with very small file sizes. | Great for final delivery of all projects but especially when sharing online. |
| QuickTime (MOV) | Export varies by Mac or Windows use. ProRes/CineForm codecs create bigger files of higher quality, with all audio/video data retained. | Better quality for locally stored HDTV or computer viewing. Suitable for further editing of compressed files outside HitFilm. |
| Audio Video Interleave (AVI) | Windows only option using the CineForm codec. Creates large, maximum quality uncompressed exports in NTSC/PAL standards. | Best for high-quality “intermediate” exports for further editing. |
Additional export formats
HitFilm’s export options go beyond video codecs to cover every project type.
- Image Sequence (PNG, JPG, BMP & OpenEXR) – Exports a video frame by frame, with each saved as its own image file of variable quality and size.
- Waveform Audio File Format (WAV) – High quality (lossless) audio files for exporting just the project’s sound in stereo.
- Filmbox (FBX) – Export format for 3D models when working with other VFX software such as Blender.
Additionally, you can also use Export>Frame to capture video frames as individual still images of various file types.
HitFilm 2021.2 added FBX camera import/export for better 3D workflow with other programs. Take a look at Blender to HitFilm VFX Course for more on working with 3D VFX.
TIP: See How to edit a zoom recording for advice on polishing up webcam footage.
Export presets explained
HitFilm has a number of built-in presets available for exporting. You can pick a Default Preset or switch between them while queuing export tasks.
Each has standard settings such as resolution, fps and file format to suit certain uses:
| Preset Name | Resolution (w x h) | Frames per second | Codec / Format |
|---|---|---|---|
| Facebook 720 HD | 1280 x 720p | 24/25/30fps | H.264 / MP4 |
| Vimeo / YouTube 1080p HD | 1920 x 1080p | 24/25/30fps | H.264 / MP4 |
| Apple iPad & iPhone | 1920 x 1080p | 24/25/30fps | H.264 / MP4 |
| YouTube 2160p UHD | 3840 x 2160p | 24/25/30fps | H.264 / MP4 |
Alongside these, you will find Uncompressed AVI and GoPro CineForm (MOV) options too. These presets provide higher quality specialist formats should you need them.
Each preset can be edited and saved as a custom User Preset for later use.
TIP: Online video sharing platforms prefer MP4 format with a maximum frame rate of 30fps.
Customizing presets
You can view all presets in the Presets tab of the Export window. Right-click a built-in preset and select Edit Preset to create a new custom copy.
As an example, we’ll list the steps for creating a square 1080×1080 preset for Instagram.
Edit Export Preset options:
- Name. Give the edited preset a name, such as “Instagram” perhaps.
- Dimensions. Uncheck the lock here to set both dimensions as “1080”
- Frame Rate / Bitrate. Leave the fps as “From Source” and lower the Bitrates if you want to reduce file sizes.
- Save a Copy. Saves the custom preset ready for export selection.
TIP: Use project settings to set the Editor size to match your export preset size.
Export Troubleshooting (FAQ)
To conclude, let’s answer a few popular questions when exporting in HitFilm.
Watermarks show when using demo add-on effects or the software is unactivated.
To export without watermark, disable any trial effects or visit File>Options>Activation to click the Activate button. The HitFilm Pro demo adds an export watermark until fully purchased.
The MPEG-2 file is native standard encoding for DVD Video. This format can be read by all players but is licensed and therefore not supported by HitFilm.
However, most DVD burning software will convert formats like MP4 and MOV.
Export presets labeled “with Alpha” will preserve transparency. This sets Channels to RGBA which adds an Alpha channel where the chosen file format allows.
For more on how to use HitFilm be sure to visit the FXhome blog and YouTube channel for essential practical tips.
