Welcome back to another HitFilm tutorial. Today, we’ll show you how to use Foundry’s Camera Tracker to place digital elements into your video footage. This tutorial focuses on the camera tracking portion of the process rather than the realistic compositing.
Here’s what we’ll be looking at:
- Prepare to track
Add the Camera Tracker effect, a Plane layer, and a keyframe a mask around the moving object.
- Track features
Use the automatic analysis and tracking tools to begin creating the track through the timeline.
- Refine the track
Scrub the timeline again to remove any bad or low quality tracks. You can also do this automatically using thresholds.
- Solve the camera
Once you’re happy with the tracks, use the Solve controls to calculate a 3D camera.
- Refine the solve
Use further tools to check for any detected errors and clean up the camera’s motion.
- Create the 3D scene
With the solve complete, this step creates the 3D camera and scene.
- Add 3D models or floating text
Now that you have a 3D tracked scene, add more 3D layers such as 3D models, logos or extruded text!
Foundry’s Camera Tracker was added in HitFilm version 13. The basic workflow to track the camera movement in your footage is to Track Features, Solve the Camera, and Create the Scene. The Camera Tracker includes various settings to fine-tune the results and produce a high-quality track.
The Camera Tracker works by identifying many small features within your video and following their movement over time. Based on these features’ movement and how elements closer to the camera move differently to those farther away, the Tracker can calculate or “solve” a 3D camera.
If you are looking for an even quicker and easier way to achieve a 3D camera track, be sure to check out our very own CamTrackAR app, available for free on the iOS App Store. This app allows you to record your video footage and 3D camera data simultaneously, preventing the need for any camera tracking in post-production.
Setup and Creating a Matte
There are several uses for a 3D camera track – examples include:
- Placing a billboard on a building.
- Adding a grunge texture to a road.
- Adding some floating text, or even a 3D model to a scene.
We began by making our clip into a Composite Shot and adding the Camera Tracker effect. If your footage has elements moving differently to the overall movement of the camera, it’s a good idea to make the Tracker ignore that movement by using a Matte as we only want the Camera Tracker to look at static features. To create a matte:
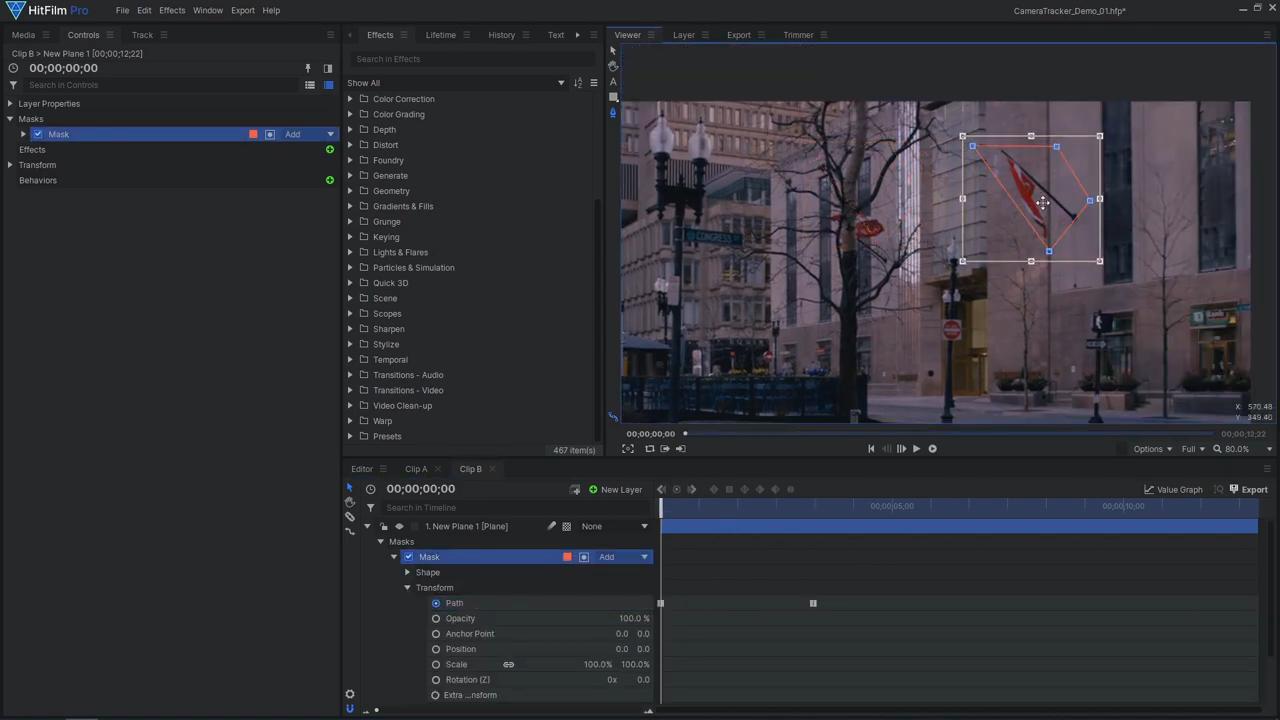
- Add a new white Plane layer, and hide it from view.
- With the Plane layer selected, use the Freehand Mask tool to draw a shape around the moving object.
- Activate keyframing for the mask Path, scrub the timeline, and adjust the mask points throughout the shot.
- With your mask finished, make this layer into a Composite Shot, making sure to move the mask with the layer.
- Back in the Camera Tracker effect, you can now select that composite you just created as the Matte Layer, setting the Matte Source to Matte Alpha. Now the Camera Tracker will not track any features within that mask shape created.
Tracking Features
We can now move on to tracking our features. To preview the features before tracking, set the Analysis Range to only track the first frame. After clicking the Track Features button, we can see the features that will be tracked. For better tracking results, we increased the Number of Features (in the Tracking settings) to 400. However, one must note that doing so increases the time taken for the program to track, but it will give the Camera Tracker a lot more information to work with giving better results. In most cases, you should use no less than 100 features. Once you have amended the Number of Features, hit Track Features again. As we don’t want any features being placed on areas lacking detail, such as the sky, increase the Detection Threshold. To spread out the tracking features, increase the Feature Separation slightly.
As our camera moves and rotates in our video, we set the Track Validation to Free Camera. If your camera was placed on a tripod and is only rotating, set this value to Rotating Camera instead. With these Tracking settings in place, we can go ahead and set the Analysis Range back to the full Source Clip Range, and click Track Features. The Camera Tracker will then track through the shot forwards and backwards.
Refining the Tracks
Before solving the 3D camera, it’s a good idea to review your trackers and remove any that are poor quality. Simply start by scrubbing the timeline and looking at the trackers. If any of them seem to move or slide around weirdly, you can select them and delete them. We can also automatically remove certain trackers based on some threshold values. To do so open up the Refine settings. As we’re currently in the tracking phase, we are only concerned with the Track controls for now.
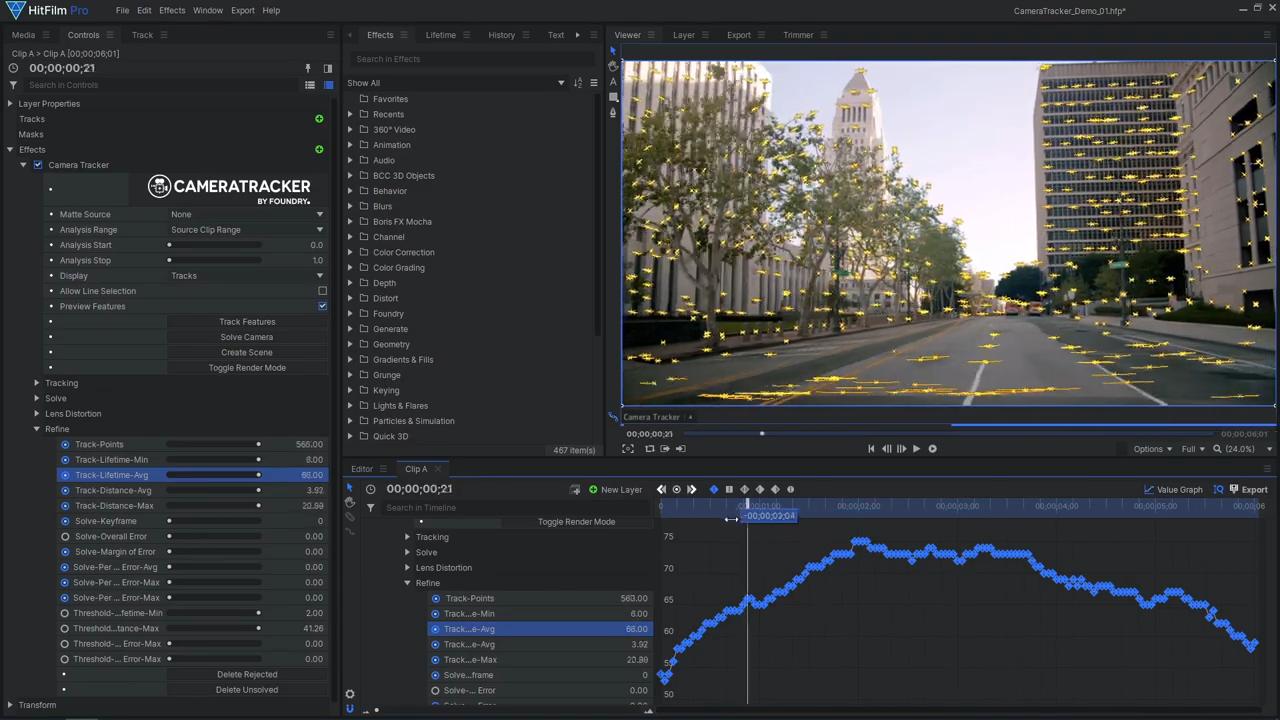
The main value we’re interested in is Track-Lifetime-Min. Select it by double-clicking, then open up the Value Graph. The Track-Lifetime-Min value shows the shortest lifetime out of all the trackers on the current frame. Compare these values to the next graph, Track-Lifetime-Avg. This shows the lifetime of all the trackers on the current frame averaged together. The average should be much higher than the minimum.
Towards the bottom of the list are four threshold settings. We can alter these settings to control which tracks we want to “reject” and delete. As you increase the Threshold for Track-Lifetime-Min, you’ll see some trackers turning red, meaning they don’t fit within the threshold. A value of 12 means that any tracks that don’t last for at least 12 frames will be rejected and removed. Depending on your shot, tracks with very short lifetimes are often good candidates to be removed. Click Delete Rejected to remove said trackers.
Solving the camera
Once you are happy with your tracks, you can move on to solving the camera. In the Solve controls, enter the correct information for the Focal Length of the lens you used and the Film Back or Sensor Size if you have it. If the lens is zooming in or out in your video, choose one of the Varying options. If your camera was placed on a tripod and is only rotating, choose Rotation Only for Camera Motion. Click the Solve Camera button, and Camera Tracker will calculate a 3D camera based on your tracking points. Scroll down to the Refine section again and look at the Solve-Overall Error. This number gives us an idea of how accurate Camera Tracker thinks the solution is. An error between 1 and 2 seems to be pretty normal, but let’s see if we can reduce it.
Refining the Solve
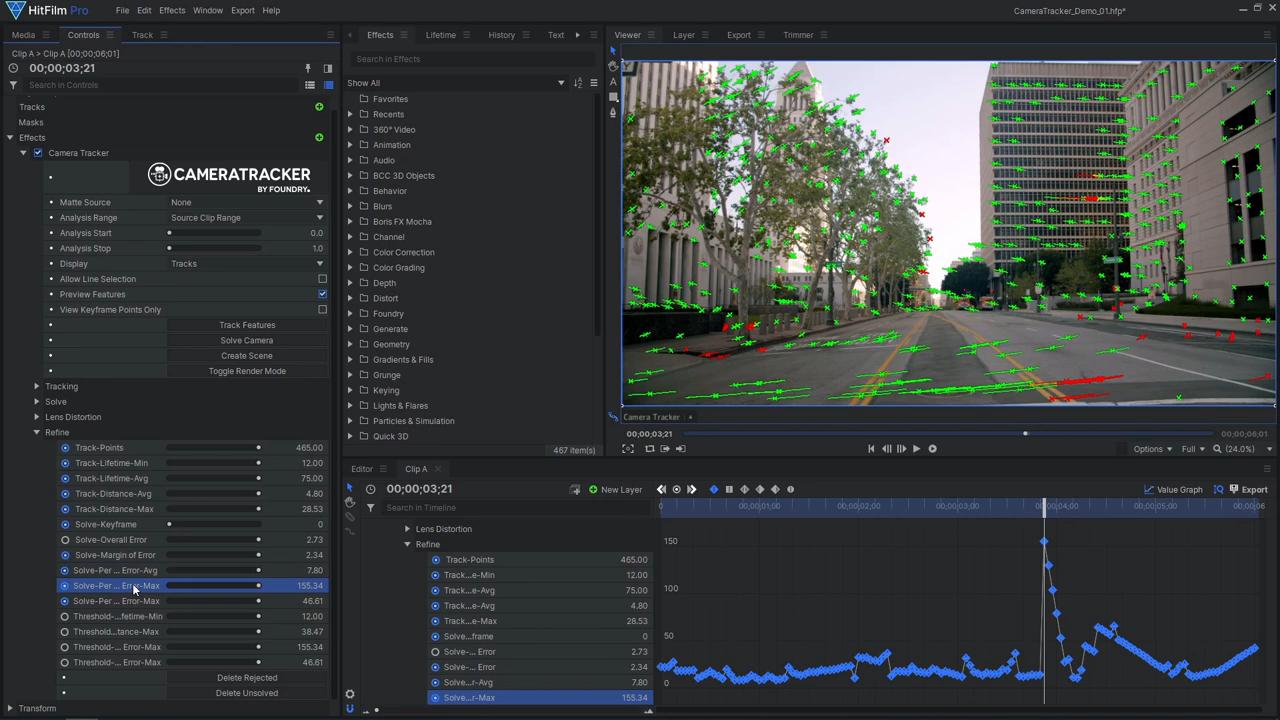
Now we can look at the Solve Refinement options to remove any problematic trackers and get an even better result. Solve-Per Frame Error-Avg shows the overall quality of the solve over time, based on the average error of all the tracks on the current frame. Compare this graph to the Solve-Per-Frame Error-Max, which shows the highest error value of any tracker on the current frame. Here you can see some pretty large spikes. Delete these high error tracks automatically with the threshold setting. After hitting Delete Rejected, your overall error will decrease.
The next value to look at is the Solve-Per Track Error-Max. Lower the threshold to get rid of any low-quality trackers with a high track error. However, you may still see some red trackers; these are called Unsolved and don’t have a valid 3D point in the solution. You can delete them by hitting the Delete Unsolved button. Now your solve error should be much lower than before, so your resulting 3D scene can stick onto the footage nicely.
Creating the 3D Scene
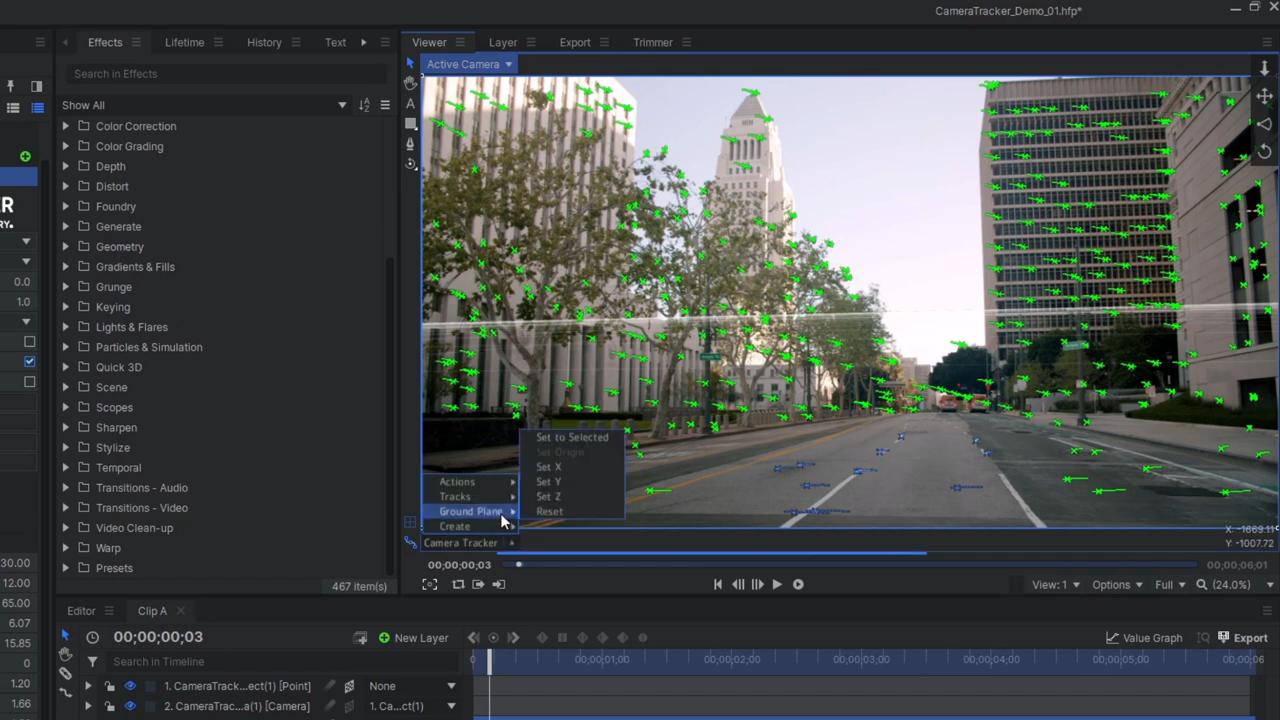
When you’re happy with your solve, you can go ahead and create the 3D scene to work with in HitFilm. Click the Create Scene button – this adds in a new 3D Camera layer parented to a new 3D Point layer. If you scrub the timeline, you can see the camera moving. To correct a misaligned floor plane:
- Select the Camera Tracker effect again.
- Click and drag a box selection over some tracking points that are on the ground in your footage.
- Then in the Tracker menu, choose Ground Plane, Set to Selected.This will match the tracked scene’s ground to the average position and orientation of those points.
- You can also scrub the timeline, select more points, and click Set to Selected to add more tracking points to the averaged ground plane. Now HitFilm’s floor plane will stick right onto the ground in your video footage. (Please note fixing the ground plane like this will not work if your camera was only rotating)
If you go to one of the other 3D views, such as Top View, you may see that your 3D scene was created far away from HitFilm’s world center. You can relocate the scene by moving the point that the camera is parented to. If your scene also appears to be upside down, you can rotate this point to realign it.
Adding 3D models
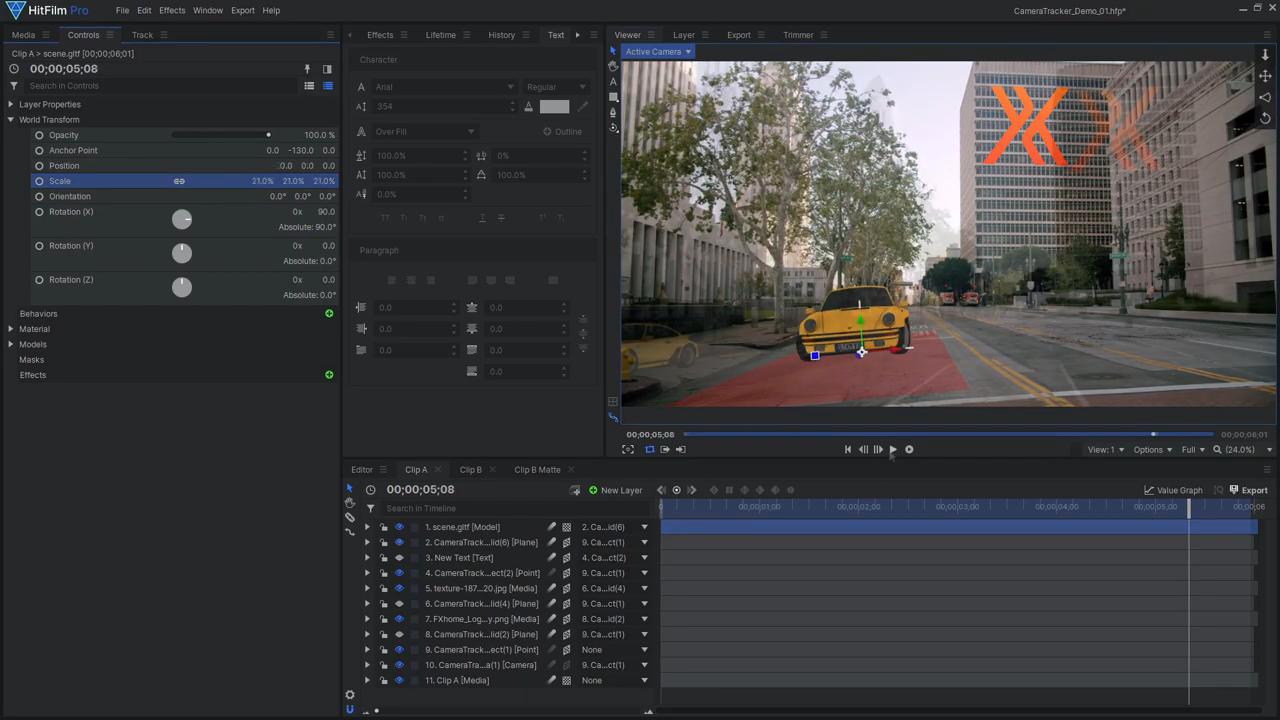
Now let’s add some 3D objects to utilize our tracked scene. With the Camera Tracker effect selected, you can create 3D Points and Planes from the tracking points. Select three or more points and create a Plane. This 3D Plane will appear to stick to the surface it was created on. If the angle seems strange you can adjust the rotation manually or try selecting some different points to start with.
Now we can bring in another layer, such as a logo graphic. Make the layer 3D, parent it to the plane, and reset its transforms. With a few Position, Scale, and Rotation adjustments, we now have the start of a neon sign or billboard effect! This isn’t only useful for signs and logos, you can use a tracked plane to add some texture to a surface such as grunge or cracks to your concrete. When doing so ensure that you use a feathered mask to hide the edges of the texture.
To create floating text:
- Select a tracking point close to where you want your text to be, and create a Point.
- Then, make your text layer 3D, parent it to the Point, reset it’s position, then reposition it.
If you want a 3D model sitting in your scene create a tracked ground plane. If you want your model to stick to a certain surface, make sure it is actually sitting on that 3D plane. The next step would be to composite these elements into the scene with some proper lighting, shadows, and reflections to increase the realism.
There you have it! You now know the basics of how to use Foundry’s Camera Tracker in HitFilm! It is incredibly useful for a wide variety of effects. Stay tuned for our next episode in which we’ll show you how to realistically composite a scene in HitFilm- see you next time!

