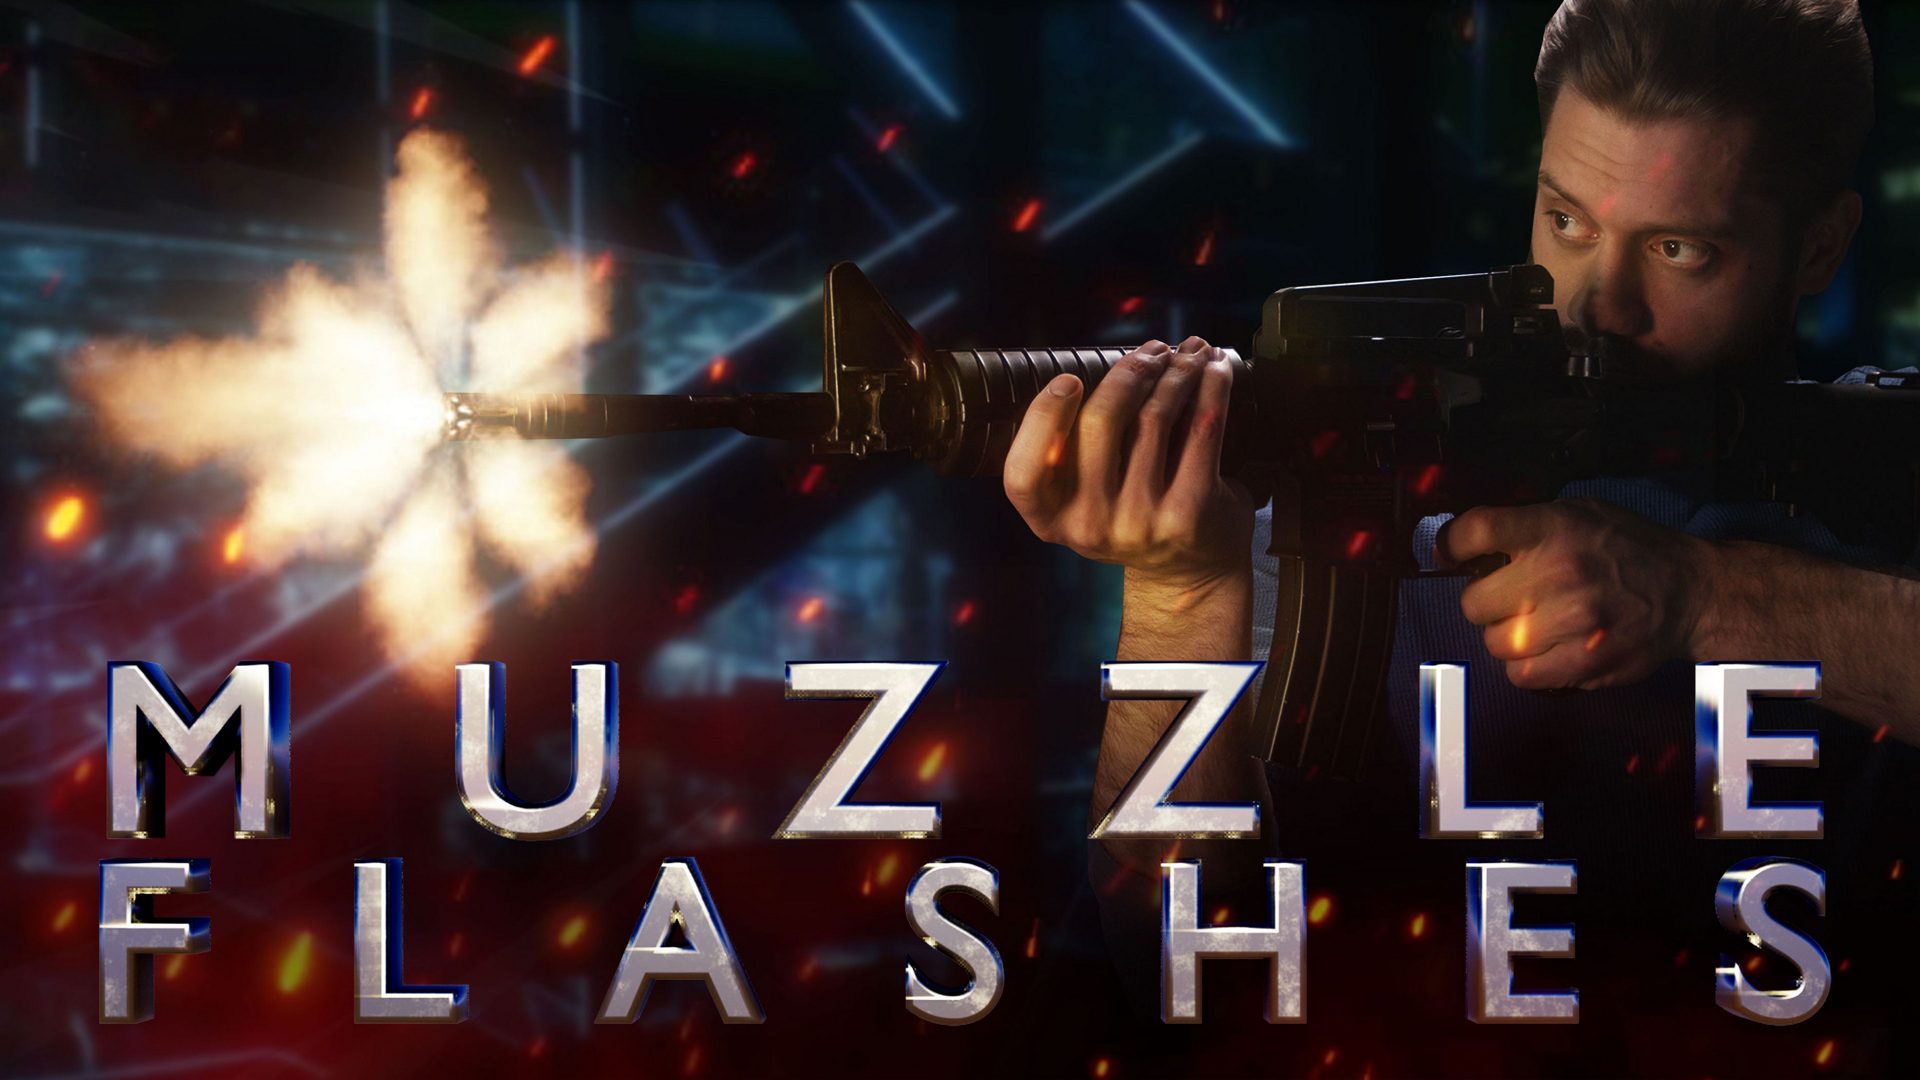
In this action-packed tutorial, we’re joined by special guest Zach Alan from Zach Alan Productions! He’ll show you how to create realistic muzzle flash effects and gunfire for your action sequences. This effect can be achieved for free in HitFilm if you are using stock footage for your muzzle flashes. Better yet, you can further scale up this effect using our 3D Gunfire effects, which allow for better customization.
So what are you waiting for? Let’s kick things into hyperdrive with this explosive effect:
- Track your muzzle flash effects
- Create the muzzle flash effects
- Fine-tune the muzzle flash appearance
- Add a puff of smoke
- Add interactive lighting
- Animate the pistol slide
- Add bullet shells
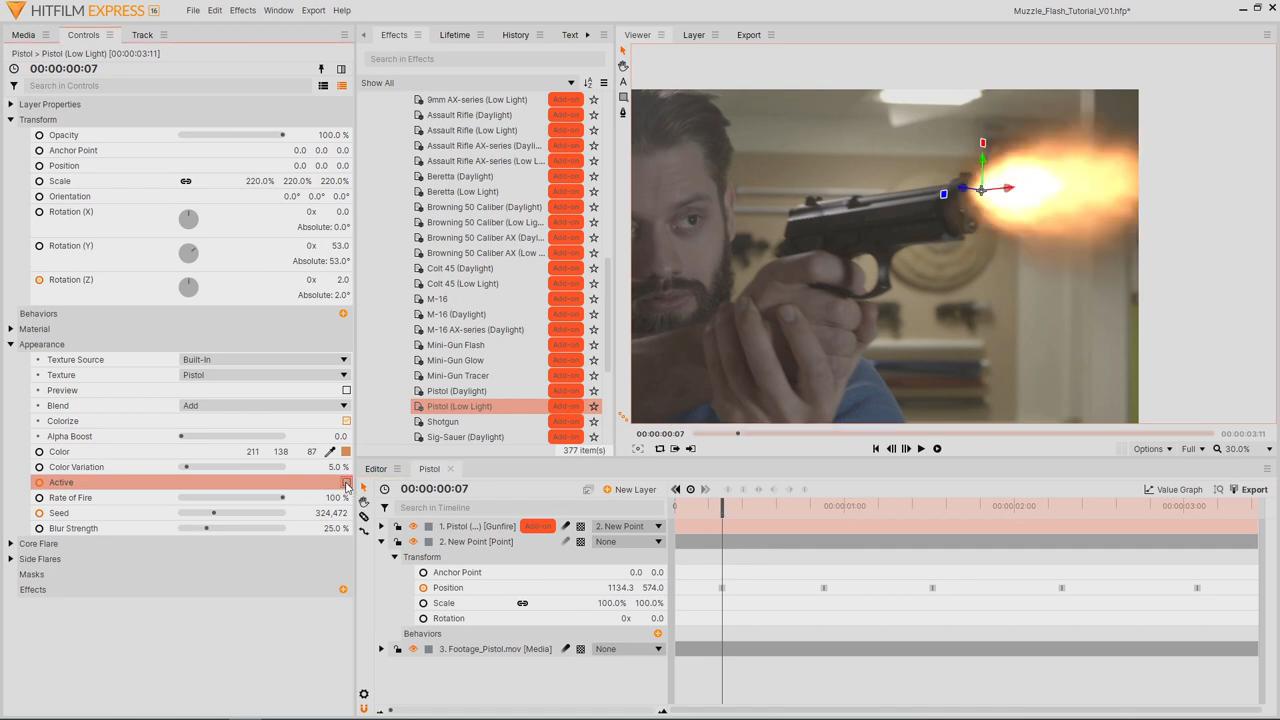
Step 1: Tracking your muzzle flash effects

First, after making your footage a Composite Shot, move the Playhead to the frame you want the muzzle flash effects to appear. Then, add a new Point layer to the Composite Shot, positioning it over the gun’s muzzle. Enable keyframing for the Point’s position so it can be animated. Then, scrub the timeline to the next frame that the gun is fired and reposition the Point. Repeat this for the rest of the gunshots. Ensure that the keyframes are of the type Constant.
If your footage contains a rapid-firing gun requiring many muzzle flashes, HitFilm’s motion tracking tools would be better suited to track the tip of the gun automatically.
Step 2: Create the muzzle flash effects
Now that we have tracked the footage, we can begin adding the gunfire effects. The traditional approach would be to use stock footage, but this technique is often limited by the angle the stock footage was shot. To counter this problem, we’ll use HitFilm’s Gunfire effect. The Gunfire effect is fully 3D, allowing the muzzle flash effects to better align with your shot. Furthermore, the effect is entirely customizable, helping you achieve that desired look.
We’ll use the Pistol (Low- Light) preset to create the muzzle flashes for our prop pistol gun. After dragging and dropping the preset into your composite shot:
- Position the flare to the gun’s muzzle.
- Parent this preset layer to the Point layer.
- In the preset’s Transform settings, adjust the flare’s 3D rotation to line up with the gun. You may want to scrub the timeline to animate the rotation to ensure that the effect continues to align with the gun.
- Adjust the scale to make the flash a realistic size.
- Animate the Active property, so the muzzle flash appears on the correct frames. If your footage frame rate is around 24 to 30 fps, each muzzle flash should appear for a single frame.
As we want the flash to look different every time it appears, animate the Seed property over the whole shot.
Step 3: Fine-tune the muzzle flash appearance
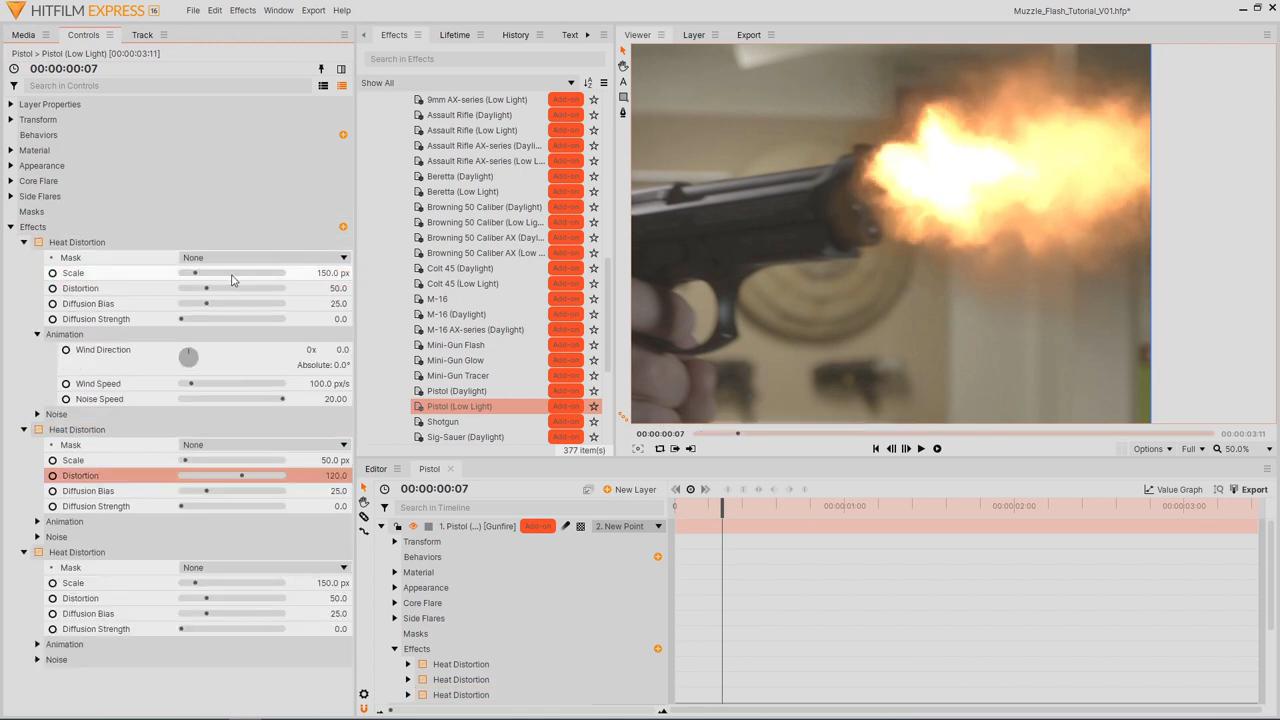
We used three different Heat Distortion effects, each with a different Scale, Noise Speed, and Distortion setting, to add variation to the flash’s appearance and enhance the details.
If your footage has a decent amount of motion blur, use the Zoom Blur effect to replicate this in your muzzle flash, setting the Center Position behind the flash. You can also add additional Blur effects to soften the flash if it seems too sharp.
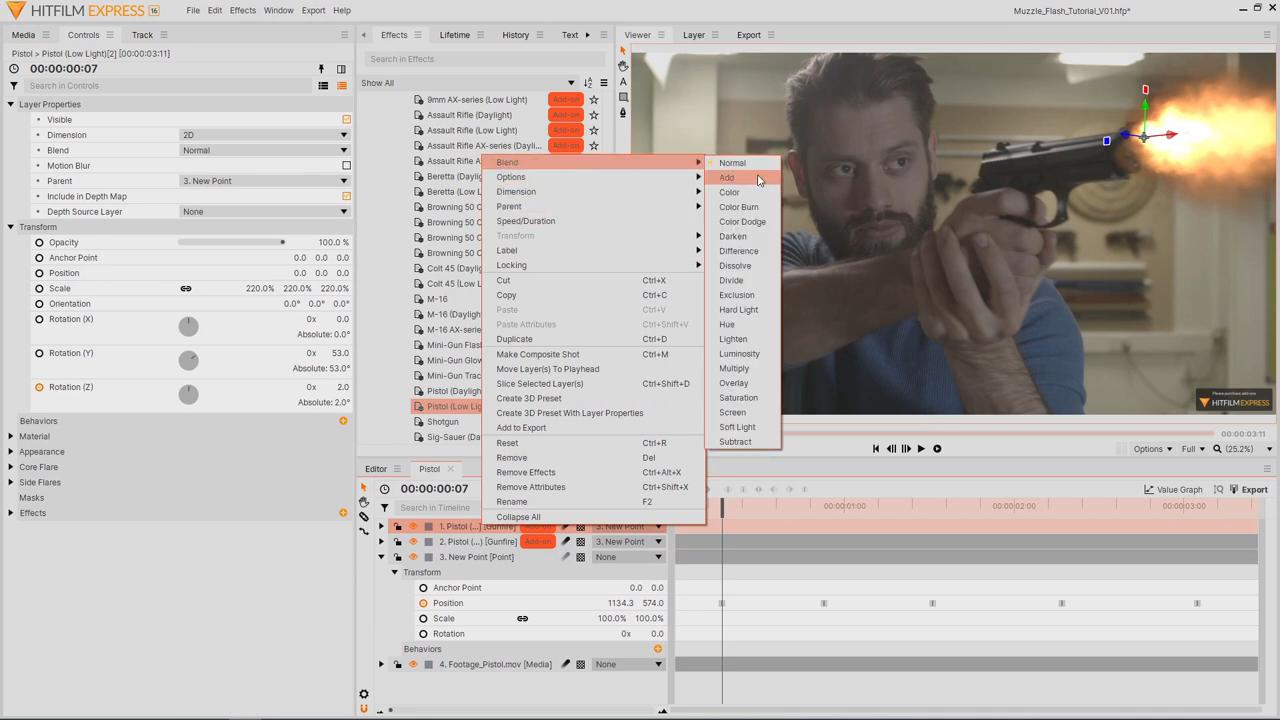
If the flashes don’t appear to blend very well with your footage, duplicate the flash layer and set the duplicates Blend Mode to Add. Adjust the duplicate’s opacity until the flash looks just right.
When adjusting the brightness of your muzzle flashes, keep in mind the surrounding environment of your footage. We filmed our footage indoors, and the lighting is rather dim, meaning that a muzzle flash would likely appear quite bright and overexposed. If your scene takes place outside on a sunny day, the flashes would appear less visible/overexposed.
Step 4: Add a puff of smoke

Another detail to enhance your gunshots is a puff of smoke following each muzzle flash – You can achieve this using HitFilm’s Quick3D Smoke effect. Adjust the smoke settings to be the correct size and density, then animate the position to start at the Muzzle and fly off-screen over a few frames. Trim this layer to appear only when it should be on screen, then enable motion blur to enhance the illusion of quick movement. Duplicate the layer and adjust the position, in the timeline, to match the other gunshots.
Step 5: Add interactive lighting
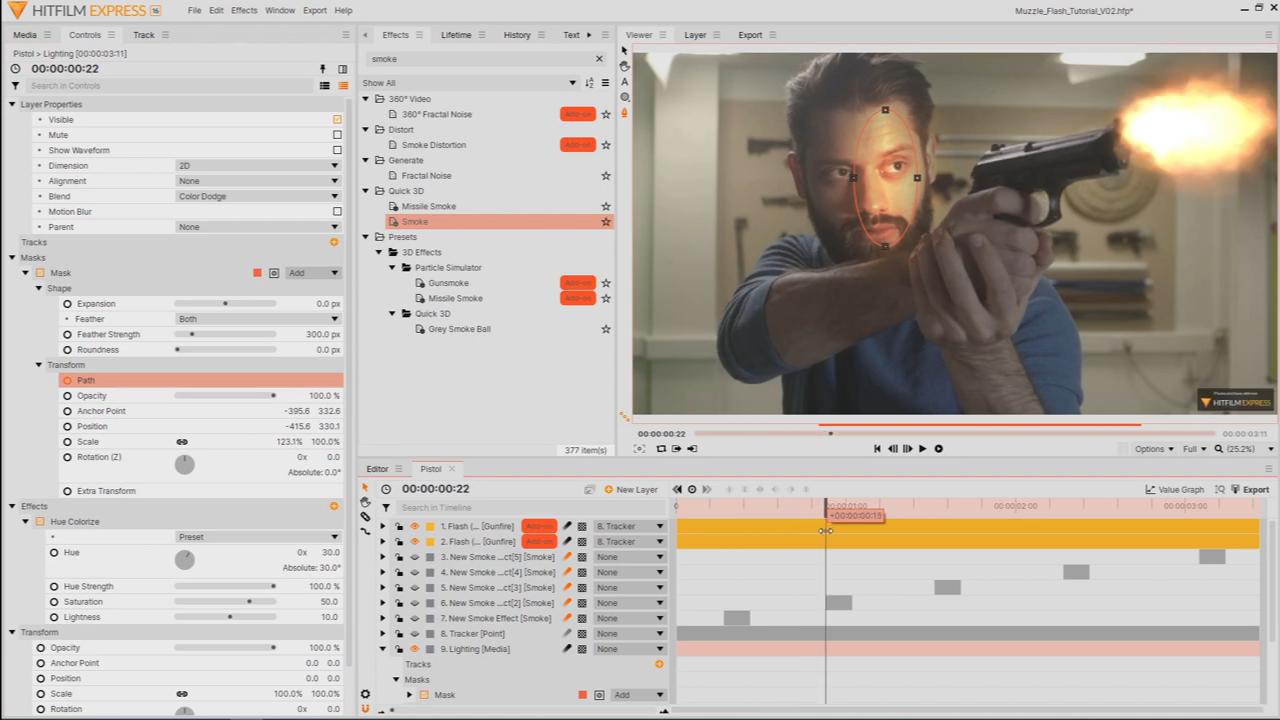
Interactive lighting is an essential part of the scene – it helps bring the effect to life. You can add interactive lighting to the scene on set using a practical light or during post-production. To create this effect, duplicate the footage layer and set the Blend Mode to Color Dodge.
- To make the color match the muzzle flashes, add a Hue Colorize effect to the duplicate layer.
- Add multiple masks to the layer in the areas that the flashes would cast light; ensure the masks have a large feather, so the edges aren’t pronounced.
- Enable keyframing for each mask’s Path and adjust their shape on each of the flash frames.
- You can even use some additional masks set to Subtract to further control where the light appears.
- Lower the opacity of the masks further away from the flash to make the lighting appear dimmer.
- Animate the duplicate layer’s Opacity down to 0 whenever a flash is not on screen.
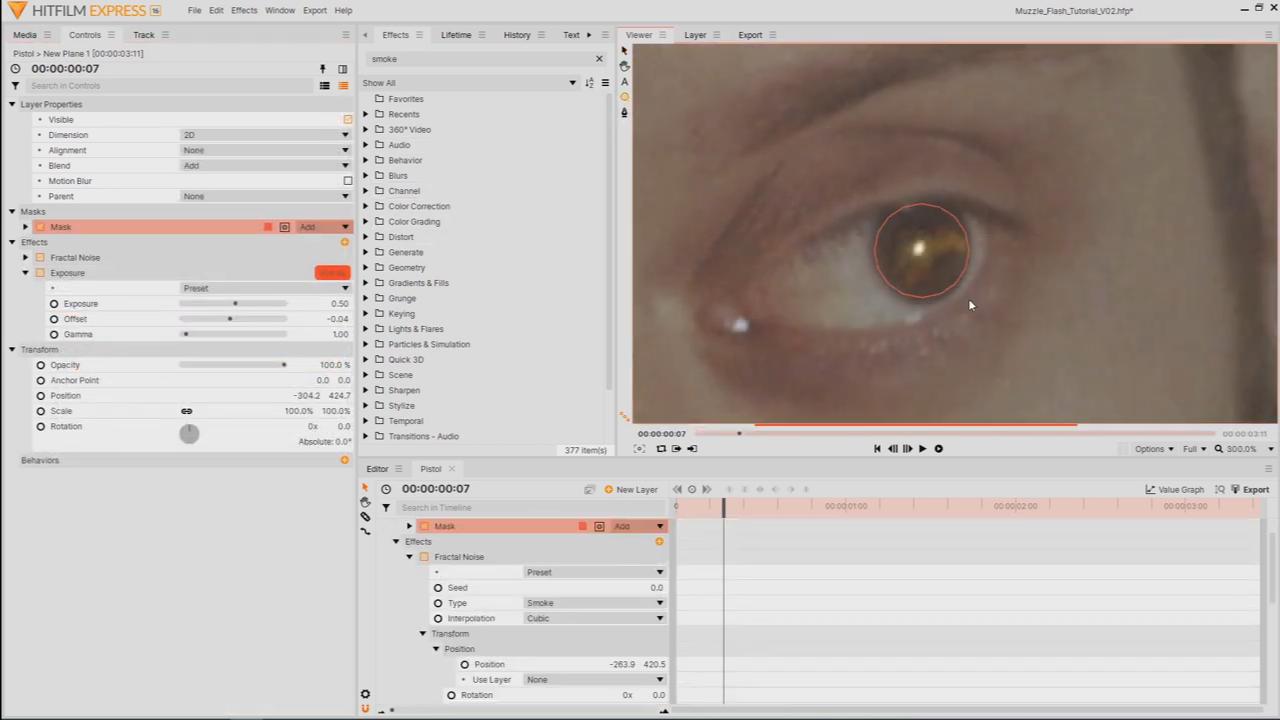
Something else you can do to add even more life to the effect is adding the reflection of the muzzle flashes to your actor’s eyes. To do this:
- Create a new Black Plane and added a Fractal Noise effect.
- Set the effect’s Type to smoke and reduce the Scale to 60.0px.
- Adjust the color to match your muzzle flashes.
- Set the Blend Mode to Add and mask the layer to appear over one of the actor’s eyes.
- Animate the mask’s position to follow the eye’s movement.
- Then duplicate this layer, moving the duplicate over the other eye.
- Adjust the duplicate mask’s shape and the position keyframes.
Step 6: Animate the pistol slide
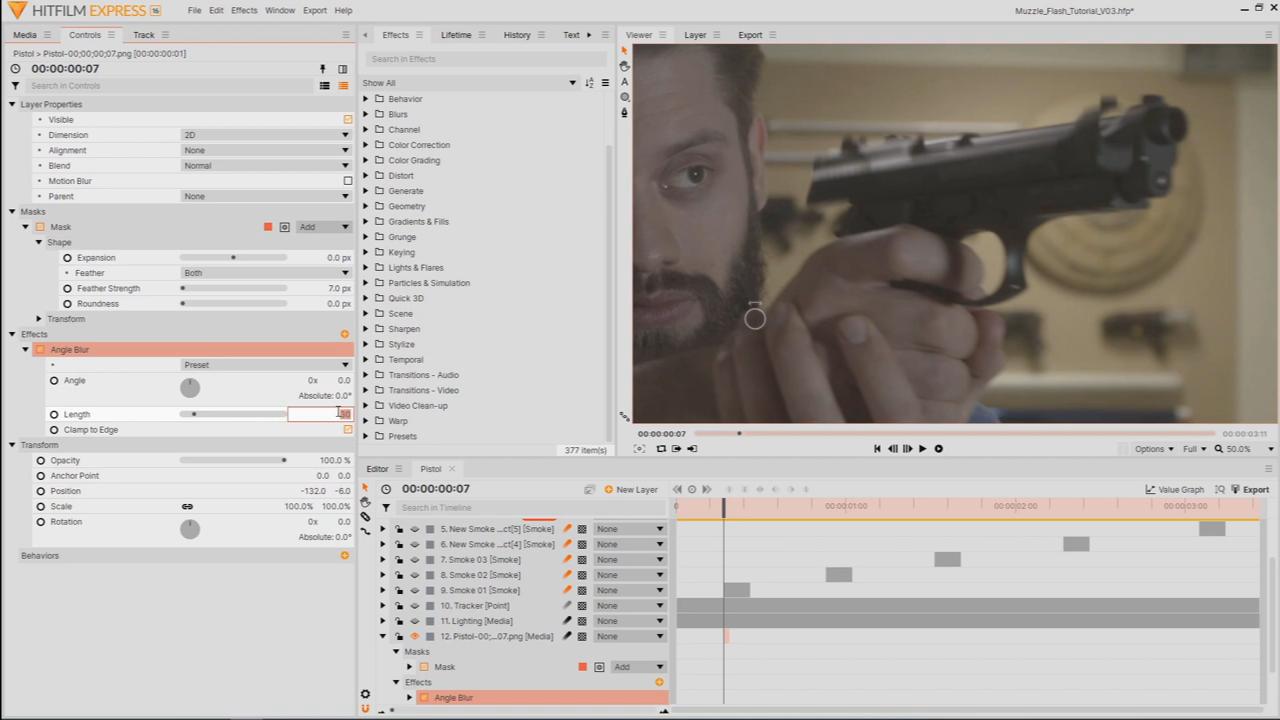
Often when a pistol is fired there is a quick motion of the slide moving backwards then forwards. A similar action can be seen when the pistol is loaded. Some high-quality props do this when the trigger is pulled, adding to the realism. However, if your prop doesn’t do so, you can create a similar effect in HitFilm. Go to a frame where the gun is fired, export the frame, then re-import it onto the timeline. Add a mask to isolate only the pistol’s sliding part, then move the layer backward along the gun. Add an Angle Blur effect matching the angle of the motion to create motion blur. This effect isn’t entirely realistic as a different part of the gun will be visible when the slide moves out of the way. However, as it happens rapidly, the effect gives the illusion that the pistol’s slide is actually sliding. Repeat this process for the other gunshots.
Step 7: Add bullet shells
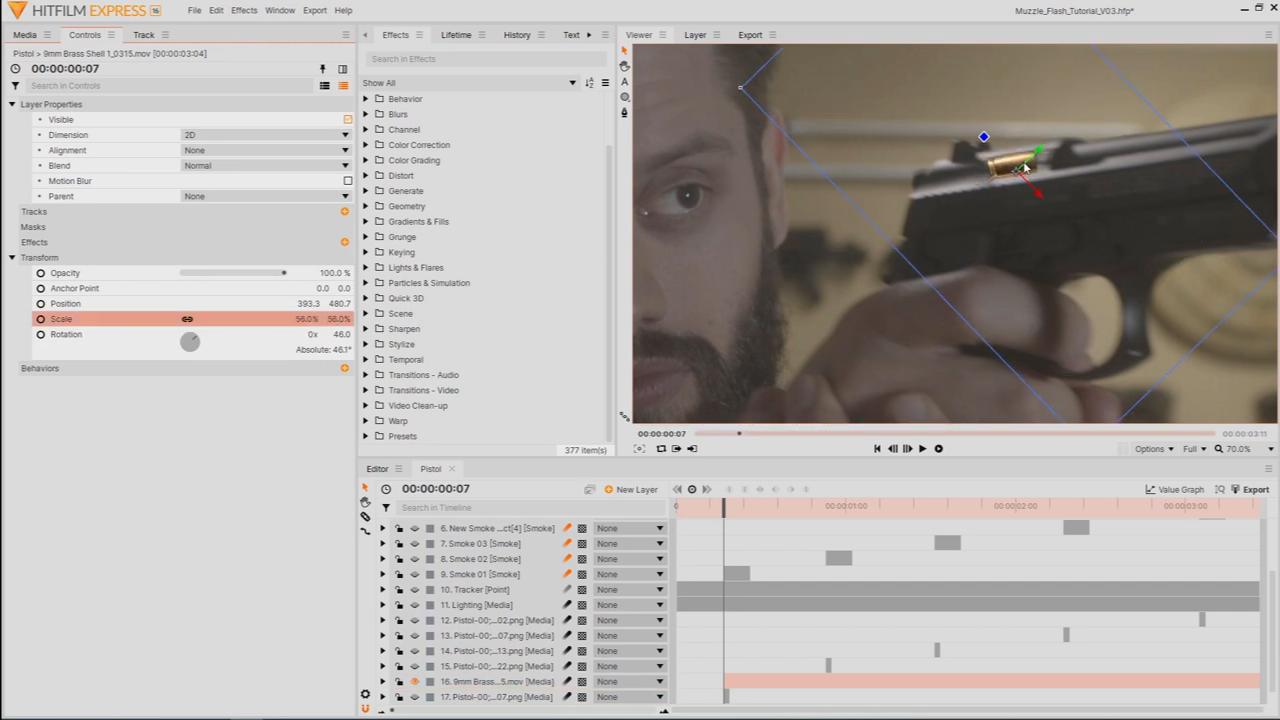
Finally, the finishing touch to this gun firing effect is to add bullet shells ejecting from the pistol. ActionVFX is a great resource for high-quality stock footage and they have provided some great bullet shell assets for free on their website! Once you have downloaded your free assets, bring a bullet shell clip onto the timeline. Position, rotate, and scale it into the place where the shell would be ejected from the pistol. Adjust the brightness and contrast, so the shells fit better into the scene. Over a few frames, animate the layer to fly off-screen. Move the layer upwards between the two keyframes to create an arc motion and enable motion blur. Duplicate this layer, move it along on the timeline to the next flash, and then adjust the position keyframes. Try to vary each duplicate’s motion slightly, so the shells don’t appear to follow the exact same path.
And that’s how you can create your very own gun firing effects in HitFilm! There are several other videos on our channel about creating muzzle flash effects, how to film with prop guns, and more. Make sure to check those out as well!