The Custom Light Flares effect was added in the last major release of HitFilm. This effect is jam-packed with tons of customizable settings allowing you to create your very own light flares! There are over 60 pre-made presets ready for you to use, and you can dive into each one and adjust every element to make it your own. The original Light Flares effect requires the stacking of multiple effects to create complex results and can be limited in the customization you’re able to achieve. However, the new Custom Light Flares effect allows for much more complex effects, all within a single control panel. Let’s take a look at this new effect and how it can add some flair to your footage.
How to add a flare to your footage
The Custom Light Flares effect comes with 60+ built-in presets to get you started. These presets were created based on reference material of real lens flares – some of which were inspired by popular movies and shows.
To add a lens flare to your footage:
- Track a 2D point layer
First, track a 2D point layer to a point on your clip that is visible throughout the entire scene – This point will allow the light flare to follow the movement. Here’s a tutorial showing you how to motion track.
- Create a new black plane layer
- Add Custom Light Flares
To this layer, apply the Custom Light Flares effect and set the layer’s blend mode to Add to blend the flare with your footage.
- Attach the flare to the tracked point
Attach the flare to one of the tracked points and set its Center coordinates, found in the Hotspot Position settings, to zero.
- Style the flare
To choose a preset and customize the flare, click the options button.
- Finish up
Once you have chosen a preset, select it and hit apply.
If you still need to adjust the flare’s appearance, simply click the options button, navigate to the Controls tab and make the desired amendments.
How to to create your own flare
The built-in presets cover a wide variety of flare styles and looks. But if you have something specific in mind, you can create a bespoke light flare from scratch! Every flare is made up of various pieces called elements, and there are three element types to choose from:
- Spot: A spot is a bright point within the flare, and is most often used as the center hotspot.
- Rays: Rays are the lines that emanate outward from the center.
- Iris: An Iris element represents the flare reflecting off the inside of a camera lens and can come in many shapes and sizes.
There are also various element presets for quickly getting a specific look.
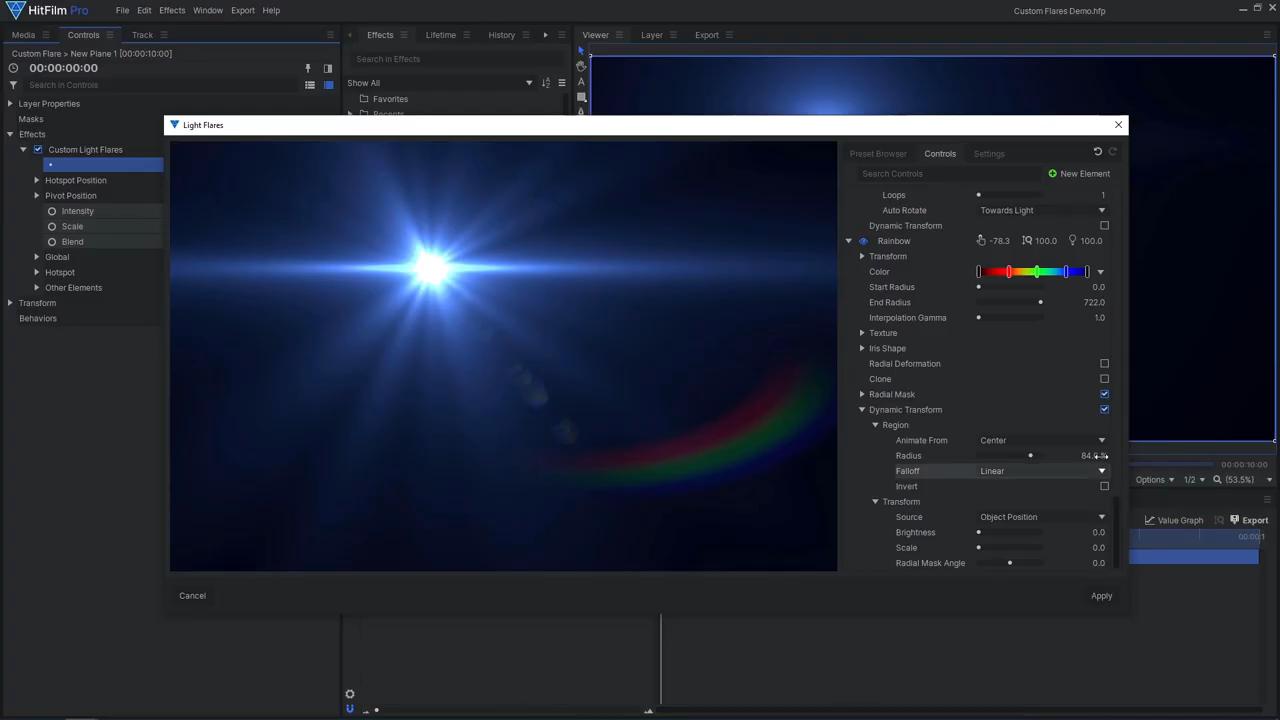
When creating a custom flare, it is often good practice to look at reference material and dissect the elements that make up the final flare. Referencing real light flares will help your own flare to look more realistic. Every element has their own controls to fully customize the shape, size, brightness, color, and behavior of that element. You can add radial deformation to add variation, radial masks to control the shape, and even dynamic transformations to alter the flare based on its position within the frame. The iris element comes with some real-world textures to add even more detail and realism.
When you are happy with your flare effect, you can save it as your own custom preset so you can load up those same settings in any project. To save your preset, right-click the preset you started with and select Save As. Now your preset will appear in your preset browser whenever you use the Custom Light Flares effect!
How to recreate a light flare
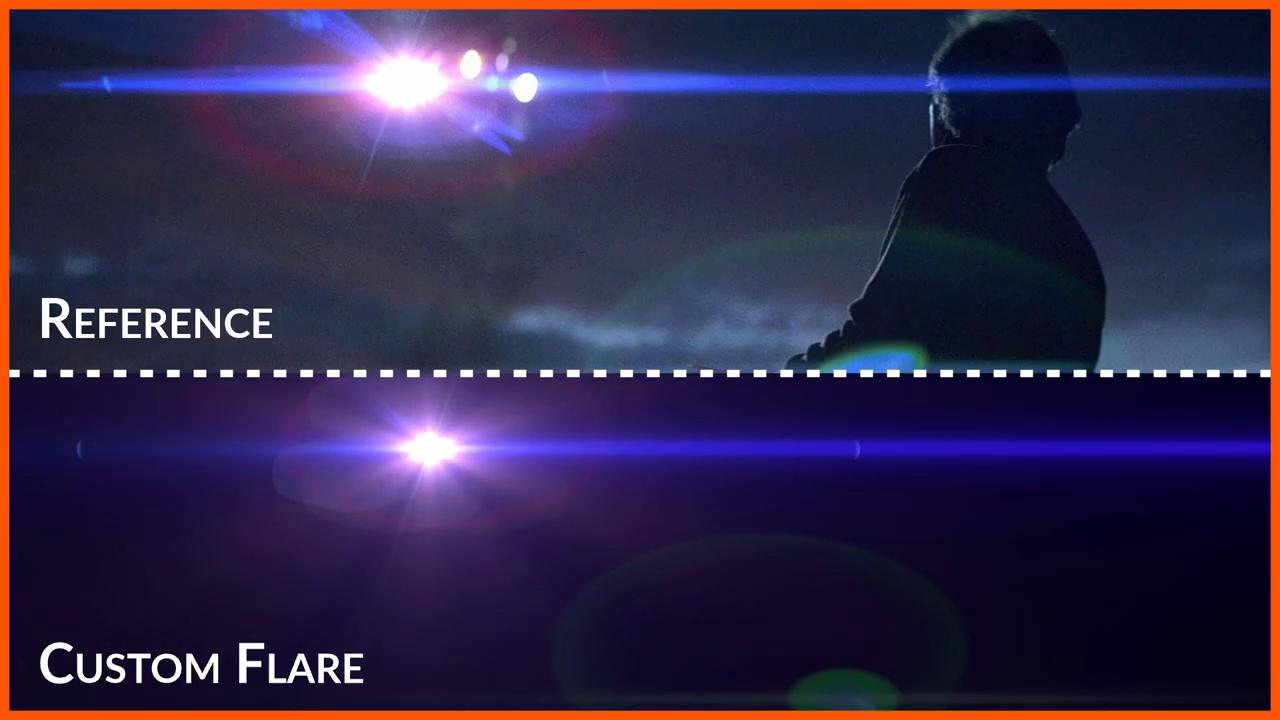
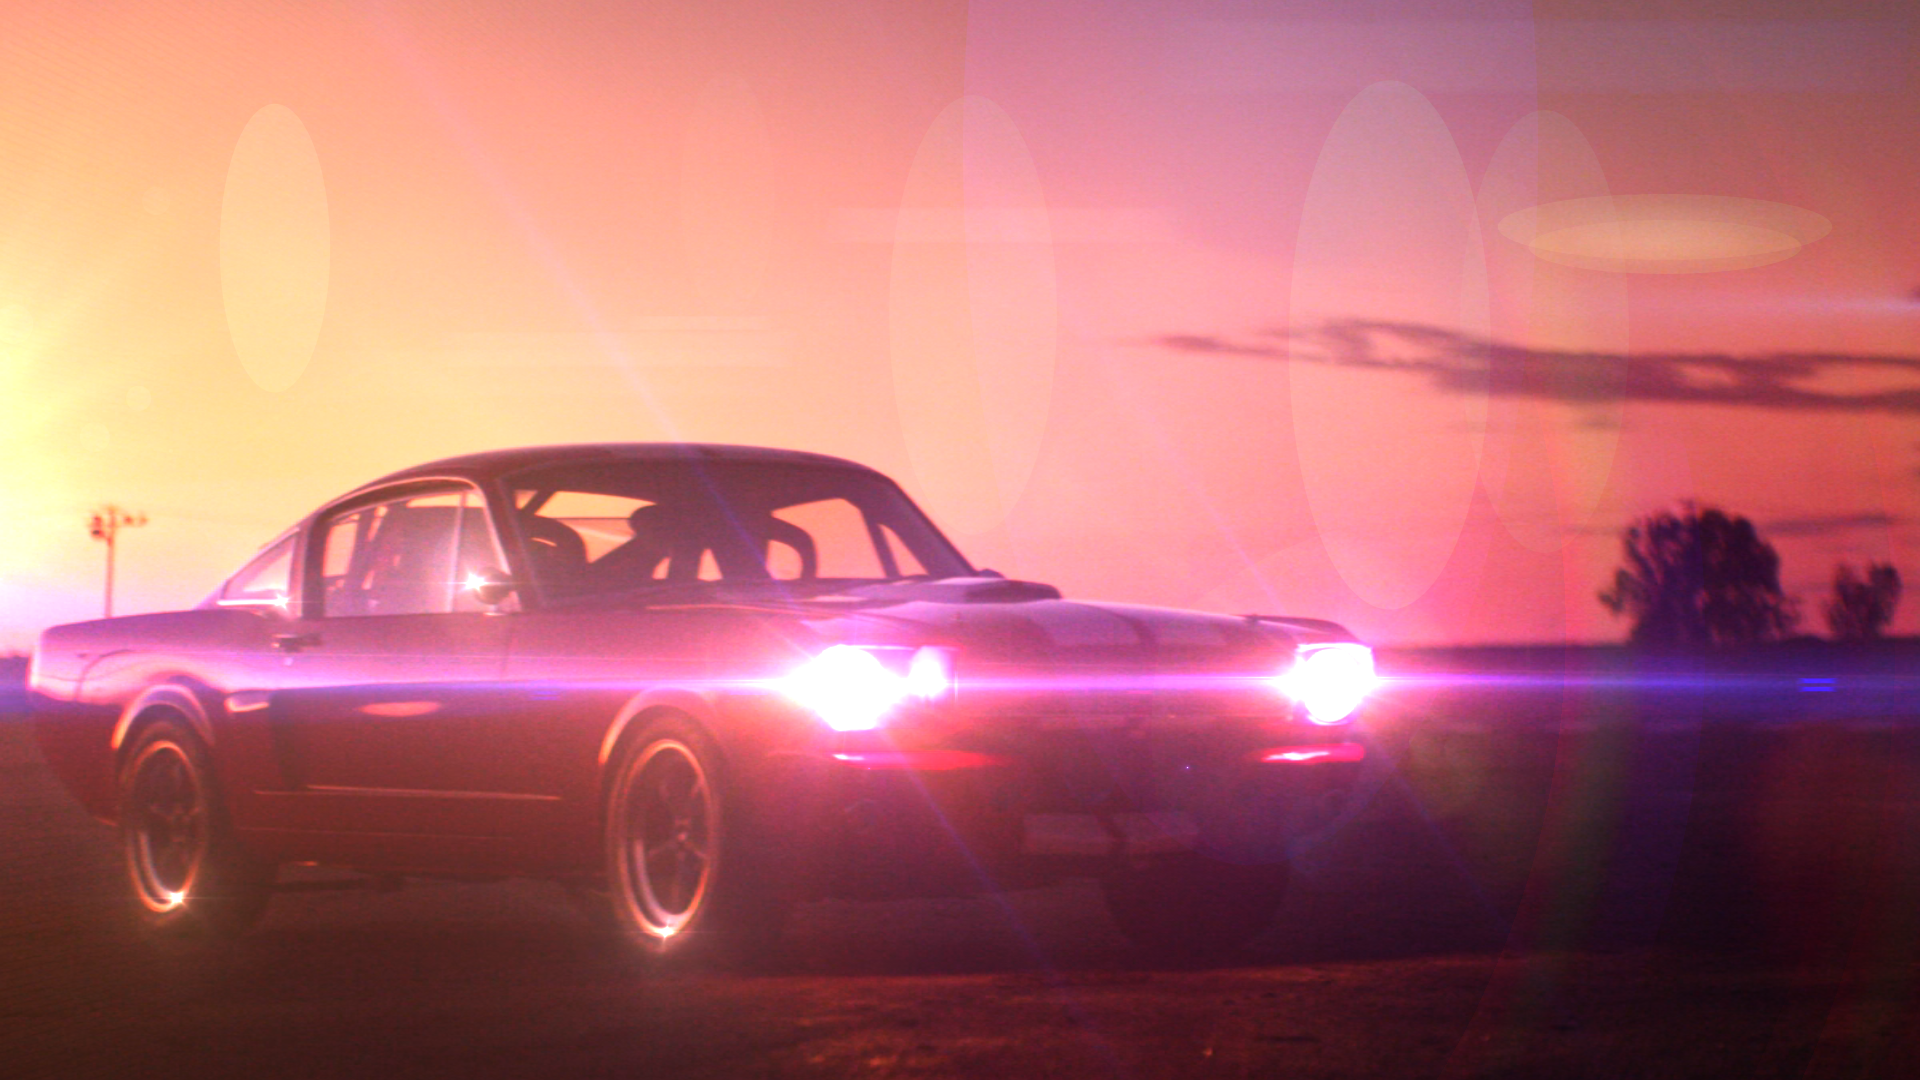
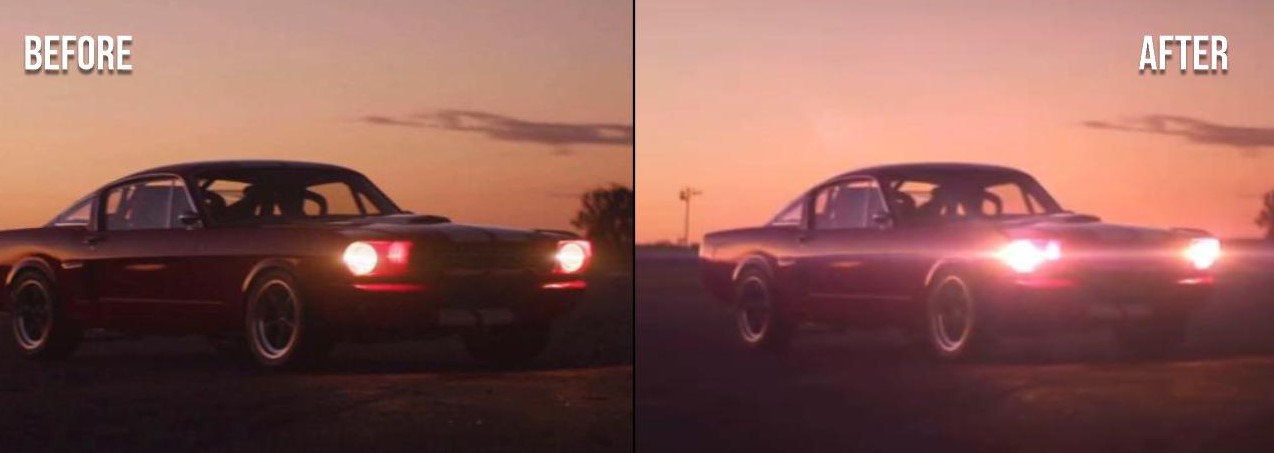
Now that we know the Custom Light Flares effect basics let’s look at how to recreate a light flare from a movie. This image is from the film Close Encounters of the Third Kind and was the inspiration for one of our presets. The key to recreating a flare like this is to break it down into small pieces instead of looking at the flare as a whole.
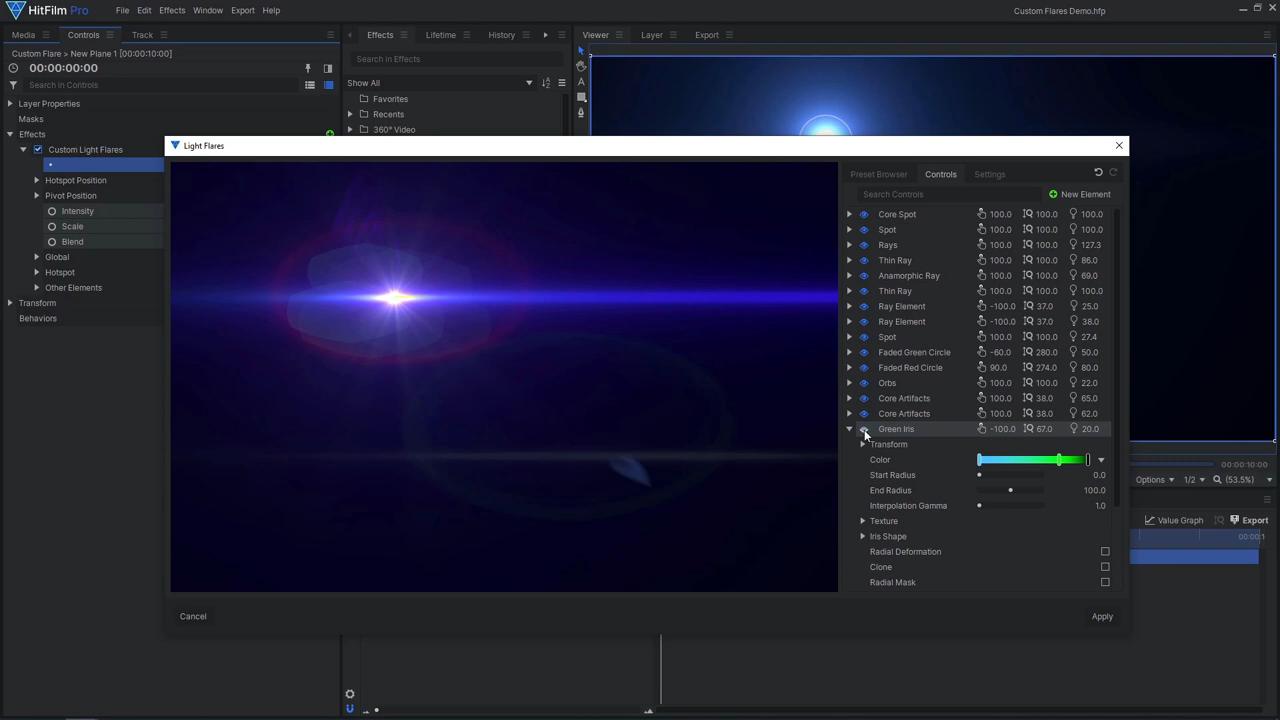
The first three elements are all spot elements, which create the center hotspot of the flare. You can adjust the Gamma for a more realistic falloff on the glow and can use the Radial Deformation feature to create light rays. The following five elements are all Rays elements to create the main horizontal streaks. You can create variation in color and brightness by using duplicate elements with different settings. Additional elements can also be used to introduce more color to the effect. The next few elements are all Iris elements, each adjusted to replicate a different small detail from the reference material. The Color Gradient slider goes from the center of the Iris to the outer edge. This can be used to add color variation, or to create ring shapes.
For anamorphic flares, make sure to use the Aspect Ratio control to squeeze or stretch the elements. Every element also has its own Blend Mode, giving you further control over how each element combines with the rest. There are many different controls to customize each element, allowing you to replicate the smallest detail of your favorite flares.
If you want your light flares to truly shine, try out the Custom Light Flares effect in HitFilm. If you don’t own it, you can download HitFilm for free here. See you next time!