Welcome to the CamTrackAR, 3D tracking software, help guide. This article provides guidance on how to use CamTrackAR to 3D track and record footage in real-time, as well as pre-visualize shots using professional chroma key and 3D model import for a seamless virtual production preview.
You can now download CamTrackAR version 2.0 on the app store
CamTrackAR help guide icon glossary
Tracking Good

Means that CamTrackAR has enough data to create a good track. You’re ready to go!
Tracking Limited: [Reason]

- Insufficient Features
- Excessive Motion
- Initializing…
Sometimes CamTrackAR may encounter difficulties gathering information from the scene in order to build your track. The reason for this will be one of the reasons stated above.
Tracking Relocalizing

If you have navigated to another app and come back to CamTrackAR, it will attempt to relocalize the scene to features it remembers previously, though always try to avoid this if possible.
Tracking Unavailable

Means that there is not enough information in the scene for CamTrackAR to track. Move your iPhone around to allow CamTrackAR to capture more of the scene.
Reset Track
Gives you the option to clear the existing data and restart your track. Tapping the Tracking Status 


 at any time will bring up this option.
Set Floor Plane

In order to do most things in CamTrackAR, like Recording, Exporting, Adding 3D content, ChromaKey etc., we need to first tell CamTrackAR which plane is the floor plane. Point the Target at any horizontal plane and tap this button. The plane will turn Yellow to show it is now the floor plane. This will also enable previously disabled buttons on the interface.
You can select another plane as the floor at any point by just tapping this button again.
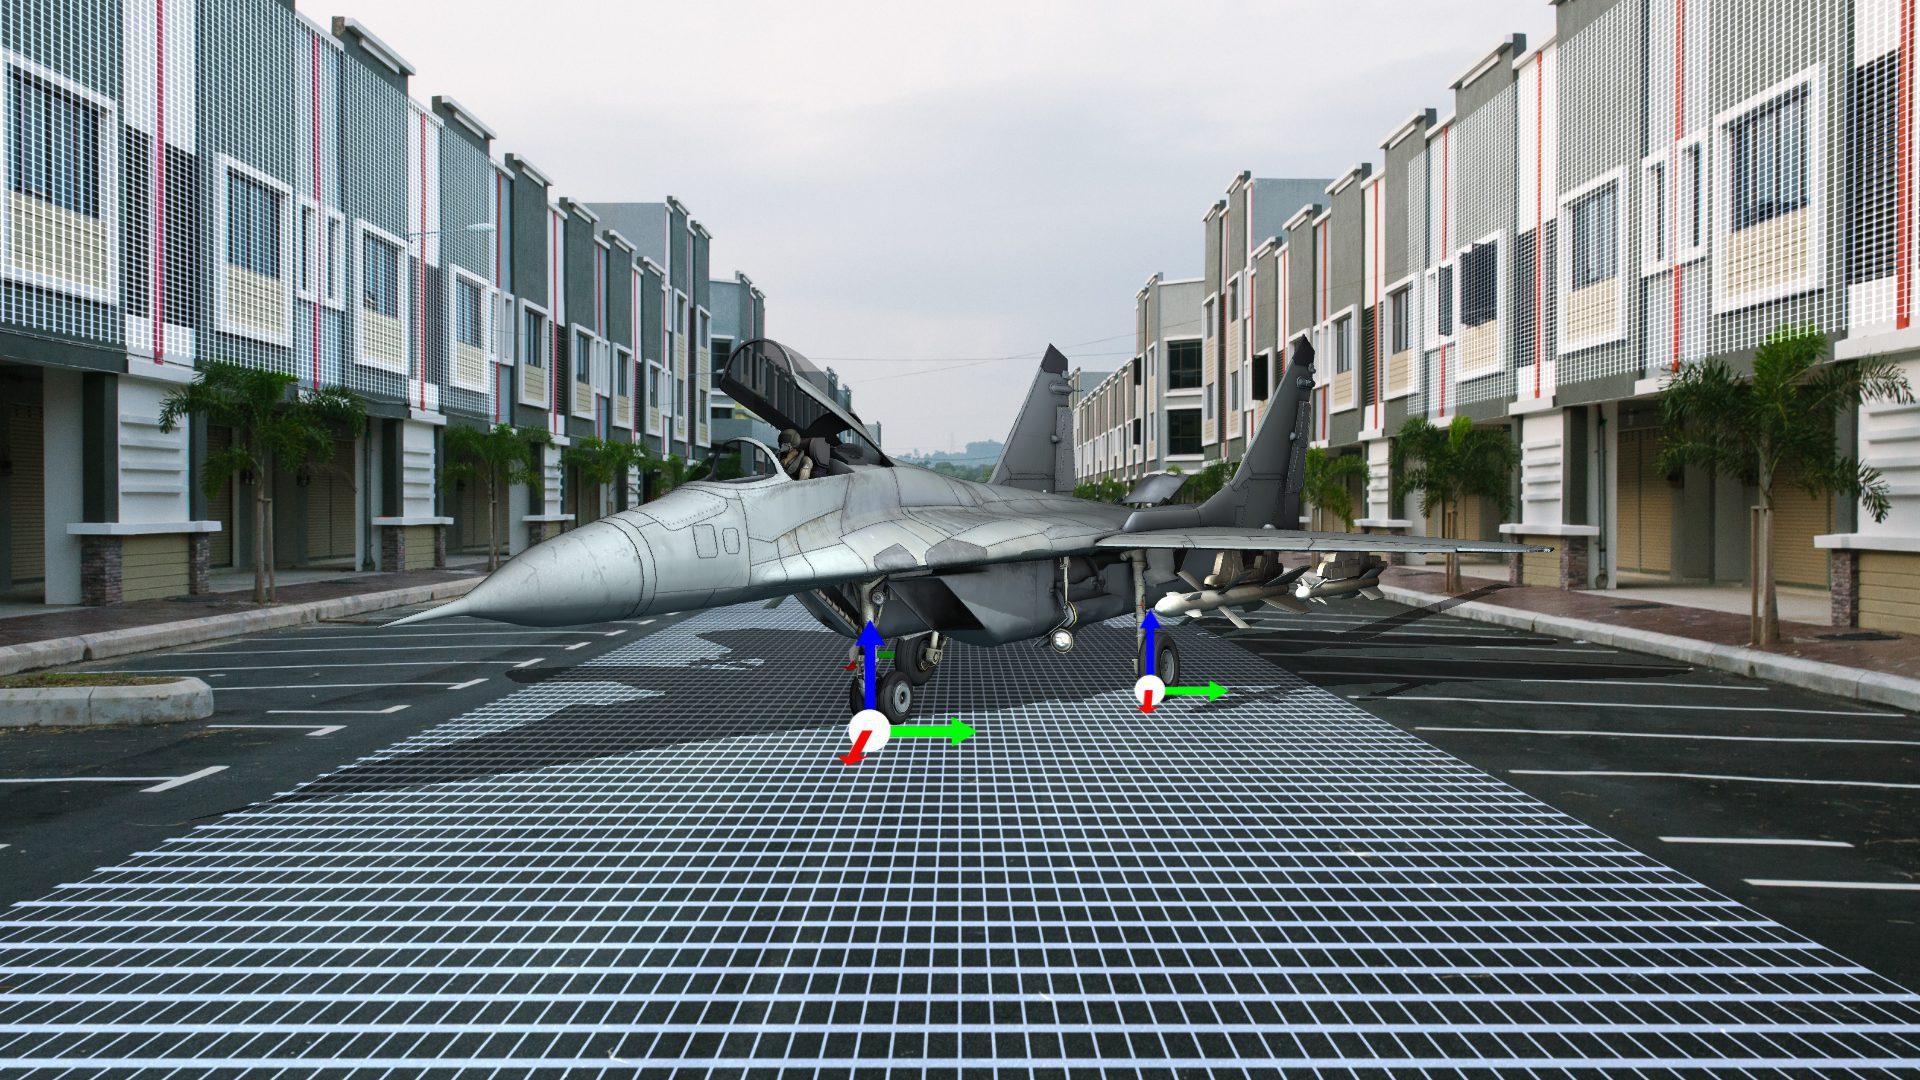
Add Anchor Point

Allows you to position anchor points in your scene. Move the iPhone to position the green floor grid in place, and press this Add Anchor Point icon to drop an anchor point in your 3D scene. The more anchor points you position in the world, the better your track will be.
Please note that this is restricted to one positioning point in the free version of CamTrackAR. Upgrade for the option to anchor multiple positioning points.
Remove Anchor Point

Allows you to remove anchor points already positioned in your scene. Move the green floor grid over an already-positioned anchor point, and a Trash icon will appear above the Record Button. Press this icon when it appears to delete the Anchor under the target.
Auto-Focus Toggle

Toggles the Auto-Focus feature to allow the camera to focus on your scene.
Auto-Exposure Toggle

Toggles the Auto-Exposure feature to allow the camera to adjust to changes of brightness in the world.
Please note that it is recommended to DISABLE Auto-Exposure if ChromaKey is being used, as it can affect the ability to keep the Keying stable.
Exposure Target Bias

Allows the use of a slider to increase or decrease the current exposure bias. This is reset if Auto-Exposure is toggled.
Auto-Color Settings

Allows the user to toggle the Auto-Color feature to allow the camera to adjust to changes of color temperature in the world. When disabled, the slider can be used to manually adjust the temperature in Kelvin.
Please note that it is recommended to DISABLE Auto-Color if ChromaKey is being used, as it affects the incoming image capture which can cause the Keying to fail due to dynamic color temperature changes.
Frame Rate

CamTrackAR supports 2 framerates, 60fps and 30fps. This button will toggle between them, showing the currently active framerate.
Start Recording

Begins the capture of both the video and the 3D camera tracking data.

Pressed when you want to stop recording. CamTrackAR will automatically export your files in multiple formats, ready to use in your post-production software of choice.
Viewer Helper Controls


These toggles appear at the top-right of the interface and allow you to disable the viewing of the 3D Scene, the Helper Overlays, and the raw Camera Feed directly.
ChromaKey Controls

CamTrackAR allows you to key out a specific color in the world. This color on the video will be replaced with the current 3D scene so you can Pre-Visualize your post-processing to get an idea of what the scene will look like early on.
3D Scene Import


When using ChromaKey, areas that are affected allow you to Pre-Visualize a 3D world, much like a window of sorts. Into this 3D Scene you import USDZ models, and regular images (from either your Files, or your Camera Roll) to use as image planes in the world.

Allows you to purchase an upgrade while in the app. Select monthly or buyout options to gain access to advanced features like export to After Effects, Autodesk FBX export, full export of raw data to Plain Text such as JSON (.json) and CSV (.csv), multiple positioning points, Live ChromaKey, 3D USDZ and Image import, as well as all future updates.

Is how you reached this page! More questions? Contact our support team at fxhome.com/ask who will be happy to help.
CamTrackAR help guide – Step-by-step instructions on how to use CamTrackAR 3D tracking software
- Move your iPhone around to capture enough information until the Tracking Status is green and you can see the white floor grid. Take time to scan the world around you.
- Point the green target grid at a detected floor plane in the world and press the
 button when you have the position you need.
 - To enhance this track, you can add anchor points in the scene. Simply move the green floor grid into the position where you want to place an anchor point and press the icon with your finger to drop one in the scene.
- Once the floor is active and you’ve added anchor points, you have the choice of switching off Auto-Focus by pressing , switching off Auto-Exposure by pressingand disable Auto-Color by pressing
 to expand the Color Settings and then disabling Auto-Color by pressing the button.
 - You can then press and begin to shoot your scene as normal.
- CamTrackAR will do all the hard work for you, capturing your video and 3D camera tracking data simultaneously.
- Press to stop the recording.
- You will see a popup that tells you which file formats CamTrackAR has exported. CamTrackAR automatically exports files to your ‘Files’ folder on your iPhone.
- If you would like to capture another track, you can press the Tracking Status icon and select , enabling you to start fresh.


 to expand the Color Settings and then disabling Auto-Color by pressing the
  button.


ADVANCED USAGE (requires app subscription)
Chroma Key ( live color removal )
CamTrackAR 2.0 allows you to detect a color in your environment to use as a key which will be replaced (live!) with a 3D scene that can be populated with items to allow a dynamic Pre-Visualization workflow.
- Once you have scanned the world a little and set the floor plane, the button will be enabled. Press this to open the ChromaKey settings.
- Switch on ChromaKey by pressing the Toggle button at the top right.
- You should now see sections of the scene being dynamically cut out. The ChromaKey does this automatically, so move to a position where your green (or blue) screen is being cut out correctly.
- Now press the button to “lock in” the current color selection and stop it changing. You can adjust the sliders below to get more fine control of the current keying.


IMPORTANT – You probably want to disable Auto Color, Auto Exposure and Auto Focus, as these can disrupt the live keying of Chroma Key.
Now that you can see the 3D horizon, we can move on to populating that world.
3D Import ( populating the pre-visualization world )
Once you have used Chroma Key to key out a part of the scene (revealing a 3D horizon behind), you may want to import 3D models or images.
You can import the following:
- 3D models in the USDZ format.
- Photographs or Images in PNG/JPEG format, taken from files or your camera roll.
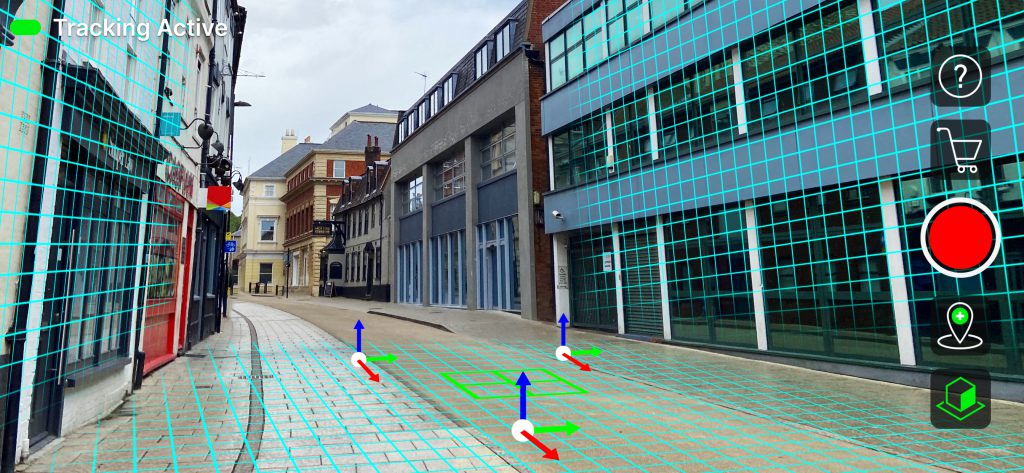
Adding 3D Content to your Scene:
- With ChromaKey active (or Camera Feed Disabled and the Floor set), you have a target in the 3D world which moves around as you move the camera.
- NOTE – you may wish to disable the grid overlays if you find the helpers distracting.
- NOTE – you may wish to disable the grid overlays

This Target is tracked to the Floor of your world, and items you add will appear at this location.
Click the  button to reveal import options.
Click either  to import 3D objects, or
 to import an image that will appear as a billboard in your scene.
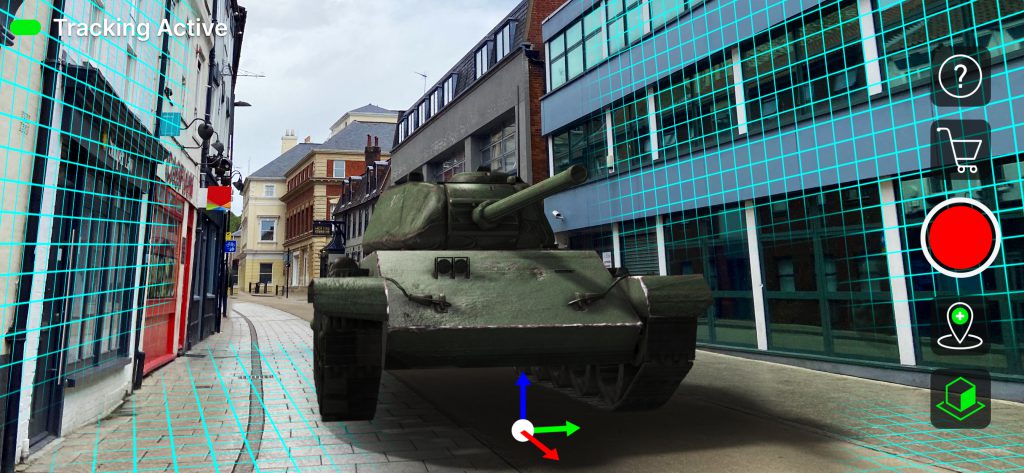
Select the item you want to import.
The item will now appear on the target in the 3D world and will move around with the target as though stuck to it.
You can now press the  to place the object in the world at that position and orientation.
ROTATION – Want to spin the object around before dropping it? Just swipe your finger horizontally across the screen.
SCALE – Want to make it bigger or smaller? Just pinch the screen to scale up or down.
ALTITUDE – Want to move the item up or down? Just use 2 fingers and swipe vertically on the screen.
Want to put the item back on the floor after adjusting altitude? Just double-tap the screen to reset it’s position on the floor.
You can place as many of the same object as you like. An anchor is created with each instance that is also exported with your scene.
Removing 3D Content from your Scene:
- When you add 3D content, you also add an anchor. It is this anchor you need to delete to delete the associated 3D object.
- NOTE – If you’re not seeing any anchors, you may need to enable grid overlays to see them.
- NOTE – If you’re not seeing any anchors, you may need to enable grid overlays
- Move over the anchor connected to the object and you should see the Trash icon appear above the Record button.
- Press the Trash icon to delete the object from the scene.
Using the files in your post-production software
First, go to the ‘Files‘ app on your iOS device and find the file(s) that apply to your software of choice (see below). Transfer these to a folder on your computer, along with your footage.
| Application | Files needed |
| HitFilm | .hfcs |
| Blender | .hfcs and blender_hitfilm_importer.py (The .py file is only needed once to install the add-on that handles files from CamTrackAR) |
| After Effects | .jsx (requires the paid version of CamTrackAR) |
| Apple Motion | .motn (requires the paid version of CamTrackAR) |
| Plain Text | .json and .csv (requires the paid version of CamTrackAR allowing you to process the data in your own custom made programs/utilities) |
| Autodesk | .FBX |
In HitFilm
Go to the ‘Media’ panel > ‘Import‘ and import the .hfcs file. This will create a new composite shot. Then import your footage for a fully tracked scene.
In Blender
The first time you use CamTrackAR with Blender, you’ll need to go to ‘Edit’ > ‘Preferences’ > ‘Install’ and find the blender_hitfilm_importer.py file. This allows Blender to read the .hfcs files from CamTrackAR and only needs to be done once.
Then, all you need to do is import the .hfcs file under ‘File’ > ‘Import’ > ‘HitFilm AR Tracking Data’, and this will import the composite shot into Blender.
In After Effects (requires the paid version of CamTrackAR)
Go to ‘File’ > ‘Scripts’ > ‘Run Script File’ and open the .jsx file to create a composite shot in After Effects. Then import your footage for a fully tracked scene.
CamTrackAR v2.0, Copyright 2021 FXhome Ltd.
Autodesk® FBX® SDK
This software contains Autodesk® FBX® code developed by Autodesk, Inc. Copyright 2008 Autodesk, Inc. All rights, reserved. Such code is provided “as is” and Autodesk, Inc. disclaims any and all warranties, whether express or implied, including without limitation the implied warranties of merchantability, fitness for a particular purpose or non-infringement of third party rights. In no event shall Autodesk, Inc. be liable for any direct, indirect, incidental, special, exemplary, or consequential damages (including, but not limited to, procurement of substitute goods or services; loss of use, data, or profits; or business interruption) however caused and on any theory of liability, whether in contract, strict liability, or tort (including negligence or otherwise) arising in any way out of such code.
RapidJSON and SwiftyStoreKit are included under the terms of the MIT License
Terms of the MIT License:
Permission is hereby granted, free of charge, to any person obtaining a copy of this software and associated documentation files (the “Software”), to deal in the Software without restriction, including without limitation the rights to use, copy, modify, merge, publish, distribute, sublicense, and/or sell copies of the Software, and to permit persons to whom the Software is furnished to do so, subject to the following conditions:
The above copyright notice and this permission notice shall be included in all copies or substantial portions of the Software.
THE SOFTWARE IS PROVIDED “AS IS”, WITHOUT WARRANTY OF ANY KIND, EXPRESS OR IMPLIED, INCLUDING BUT NOT LIMITED TO THE WARRANTIES OF MERCHANTABILITY, FITNESS FOR A PARTICULAR PURPOSE AND NONINFRINGEMENT. IN NO EVENT SHALL THE AUTHORS OR COPYRIGHT HOLDERS BE LIABLE FOR ANY CLAIM, DAMAGES OR OTHER LIABILITY, WHETHER IN AN ACTION OF CONTRACT, TORT OR OTHERWISE, ARISING FROM, OUT OF OR IN CONNECTION WITH THE SOFTWARE OR THE USE OR OTHER DEALINGS IN THE SOFTWARE.